Published at Jan 17, 2023
How to pick the right trail camera? Detailed Buying Guide
Everything you should know before buying.
To make the right choice when buying a trail camera, it is important to answer a few basic questions - do I want the trail camera to send me photos instantly via MMS, or is it okay if I view them later from the memory card after checking the trail camera? Do I want the most beautiful photos and videos because I want to show them off, or do I just need to know what animal and when it was in front of the trail camera? Am I looking for the highest quality trail camera and don’t mind paying extra, or would I rather get something with good value?
We use different trail cameras and setups ourselves, depending on the conditions and circumstances. We have tested them in the long-term and can therefore recommend which model and settings to choose for any conditions.
In this article you will learn:
- What a trail camera is and how it works
- What the main parameters of trail cameras are and how to navigate them
- How to not be fooled by parameters artificially inflated by manufacturers
- How to send photos from a photo trap directly to your smartphone
- How long the batteries in a trail camera last
- How to choose the right memory card for your trail camera
- Which models we liked personally
What is a trail camera and how does it work?
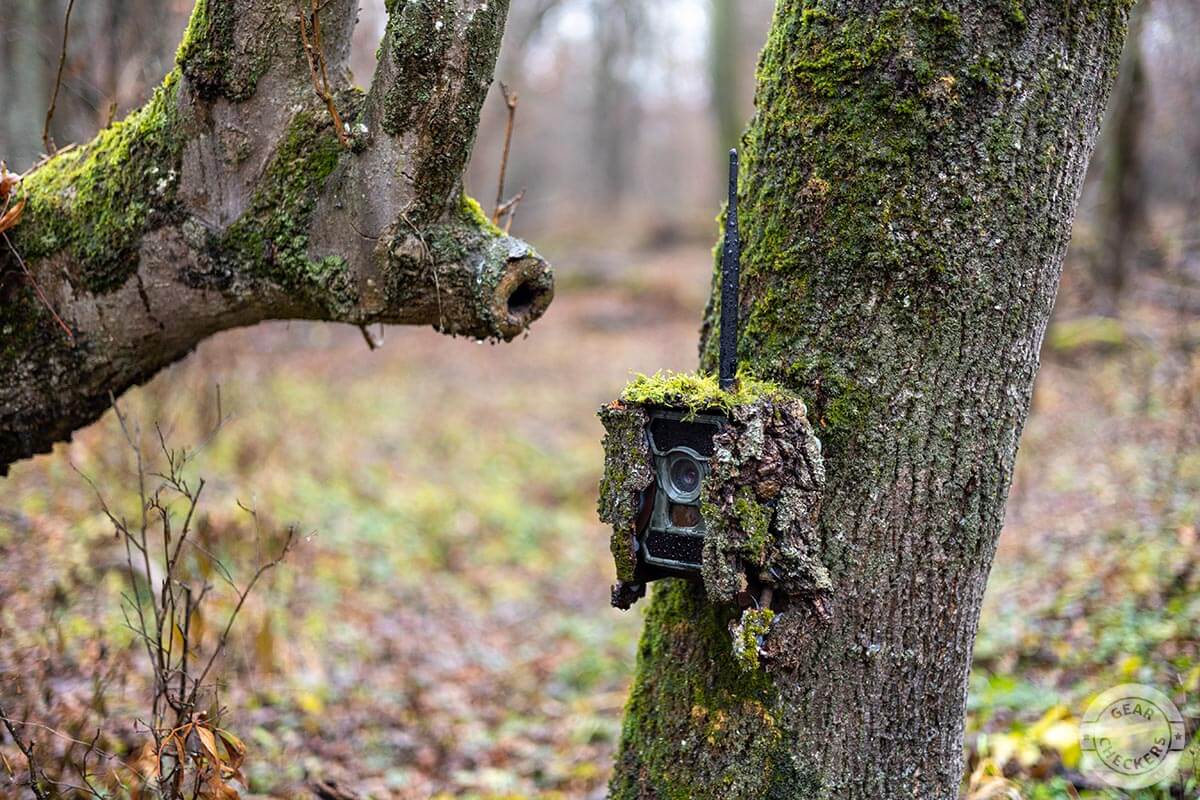
Trail cameras (or camera traps) are special devices that automatically capture photos or videos when they detect motion. This would most often be the movement of people or animals. They are thus most commonly used to monitor property and protect against burglars, or to detect animal activity.
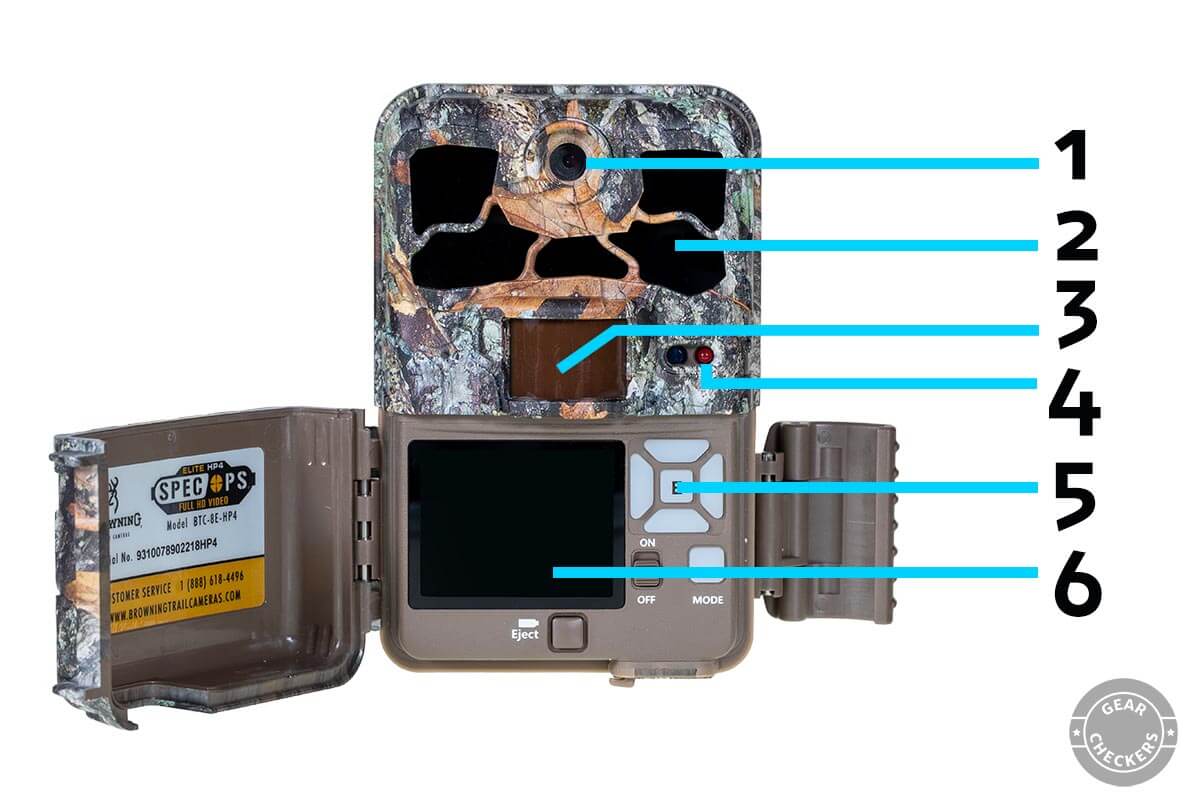
A trail camera consists of the camera, motion sensor, night illuminator and control elements. It is most commonly powered by 4-8 AA batteries, but can often support 12V external power supply too. You can leave the trail camera by your cabin, or in a tree in the woods, for extended periods of time. There are models that can run for more than 12 months on a single power cell.
Some trail cameras can send you the captured images directly as MMS or email. This lets you know what’s happening in front of the trail camera in real time. Meaning you don’t need to go check the memory card in the trail camera as often. It is also a great tool for protecting your property.
PIR Motion Sensor for detecting movement in front of the trail camera
Trail cameras use a PIR sensor to detect infrared radiation, i.e. the heat emitted by warm-blooded animals to capture movement in front of the trap. In addition to trail cameras, these sensors are also often used in automatic lights and certain types of alarms. In order for the trail camera to take a picture, a source of heat must be moving in front of the sensor.
Camera
The quality of the cameras used in trail cameras varies quite a bit, with some taking crisp and clear photos, while others take grainy and unsharp ones. There are also big differences in video quality. As you’ll learn below, the quality of the resulting footage is also highly dependent on the sensor used. You’ll find sample photos and videos in our reviews to give you an idea of what results to expect from a particular trail camera.
Night Illumination
Used to illuminate a dim scene - various designs of infrared illuminators are used most commonly. The illumination of some trail cameras is virtually invisible to the human eye, and even most animals. However, the illuminators in cheaper trail cameras are often highly noticeable. There are even models on the market with the classic white flash you know from your camera or mobile phone. These are particularly useful when you need to take detailed and coloured images at night.
Control Elements
Nearly all trail cameras have a built-in screen - either directly on the front, or with a design that opens to reveal the screen hiding inside. The buttons can be large with good ergonomics, or relatively small and difficult to access.
A more detailed explanation of how the trail cameras works with graphic examples is in a separate article:
What are the main parameters of trail cameras and how to navigate them?
You can find different parameters for each trail camera, but some will affect your satisfaction significantly more than others.
Image Resolution
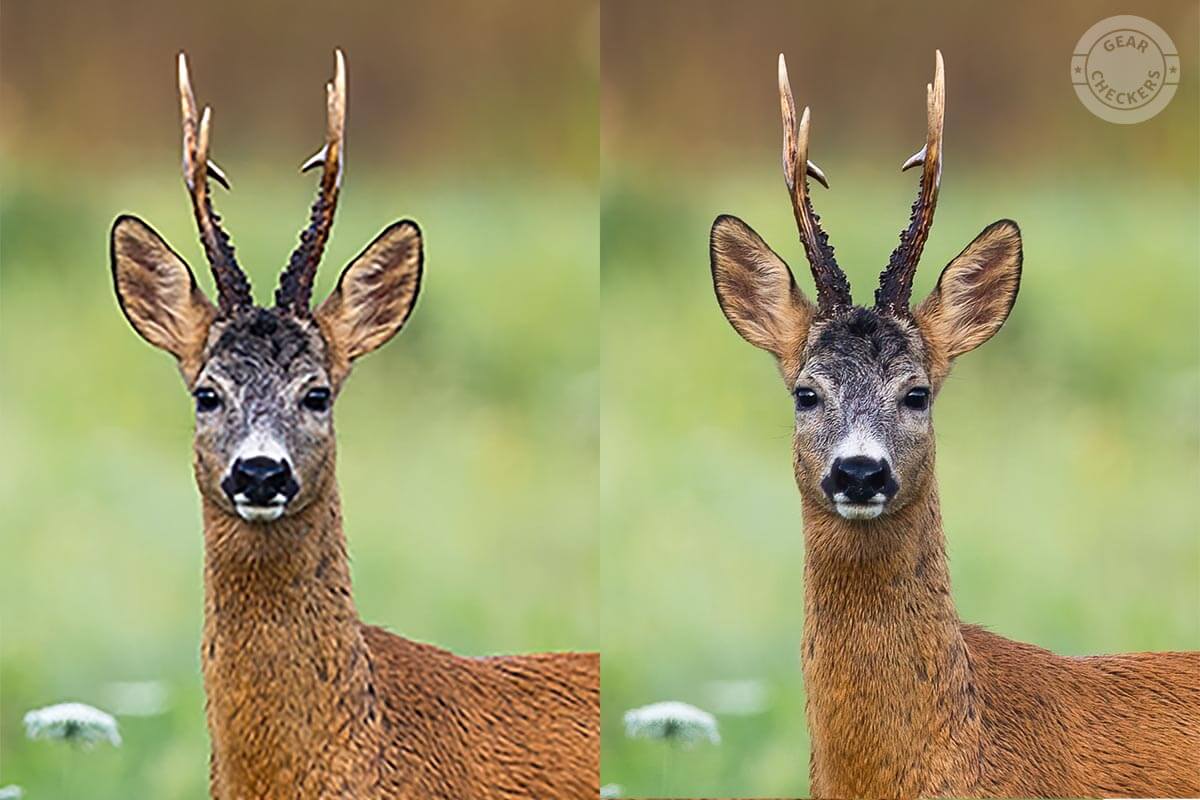
This determines how detailed the photo will be. It means how many pixels it will have. In general, the higher the resolution, the more detail you will see in the photo. This is probably the parameter inflated by manufacturers the most by far, so be especially wary here.
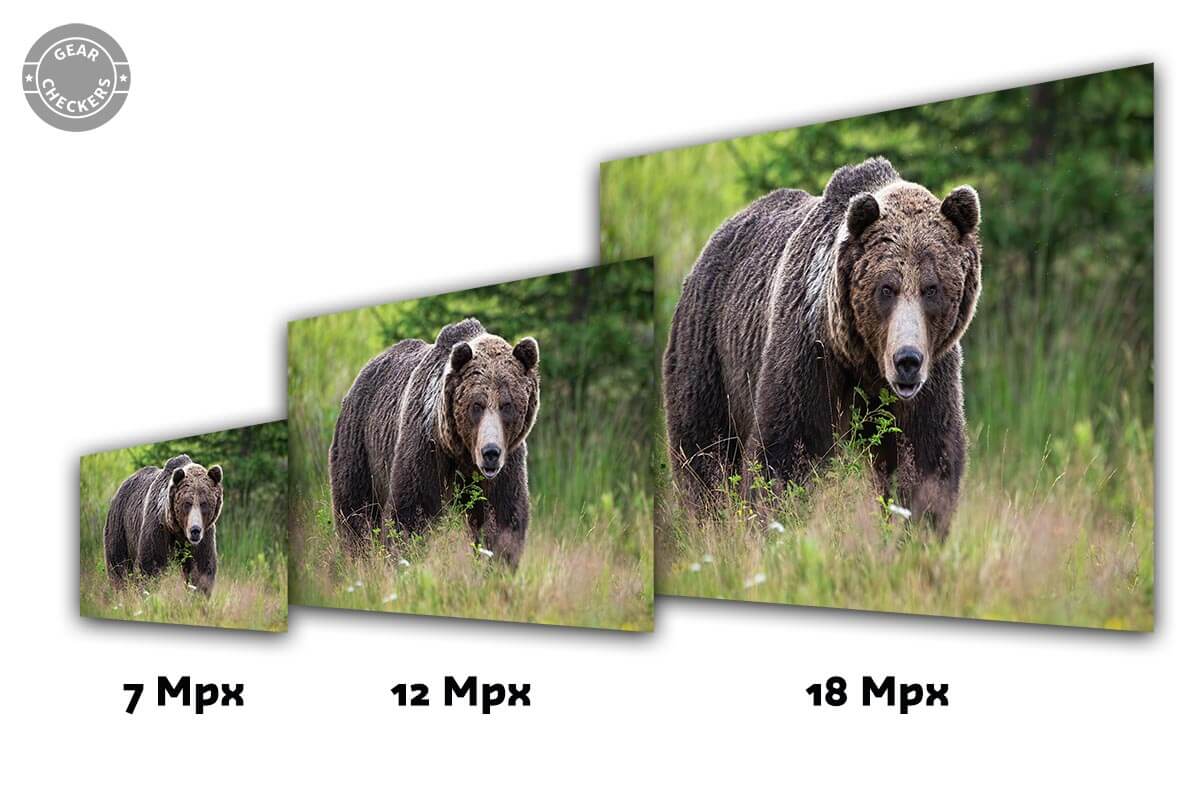
Artificial Resolution Enhancement - Interpolation
Most trail cameras have a sensor with a relatively low resolution, typically 2-5 megapixels. However, you can choose significantly higher photo resolutions in the menu, often upwards of 20 megapixels. Since a trail camera can only take a photo with the same resolution as the sensor itself (i.e. 2-5 megapixels), it then digitally enlarges the photo to several times its original size and saves it on the memory card. However, this process does not increase the amount of detail in the photo in any way, it just enlarges it. Moreover, photos enlarged in this way take up a lot more space on the memory card, plus the process of digitally enlarging them consumes additional battery power.
between 2 similar trail cameras, with one boasting a resolution of 4 Mpix and the other 22 Mpix, you will be likely to think the latter must be inherently better. As we have explained, that is not the case at all.
Video Resolution and Frame Rate
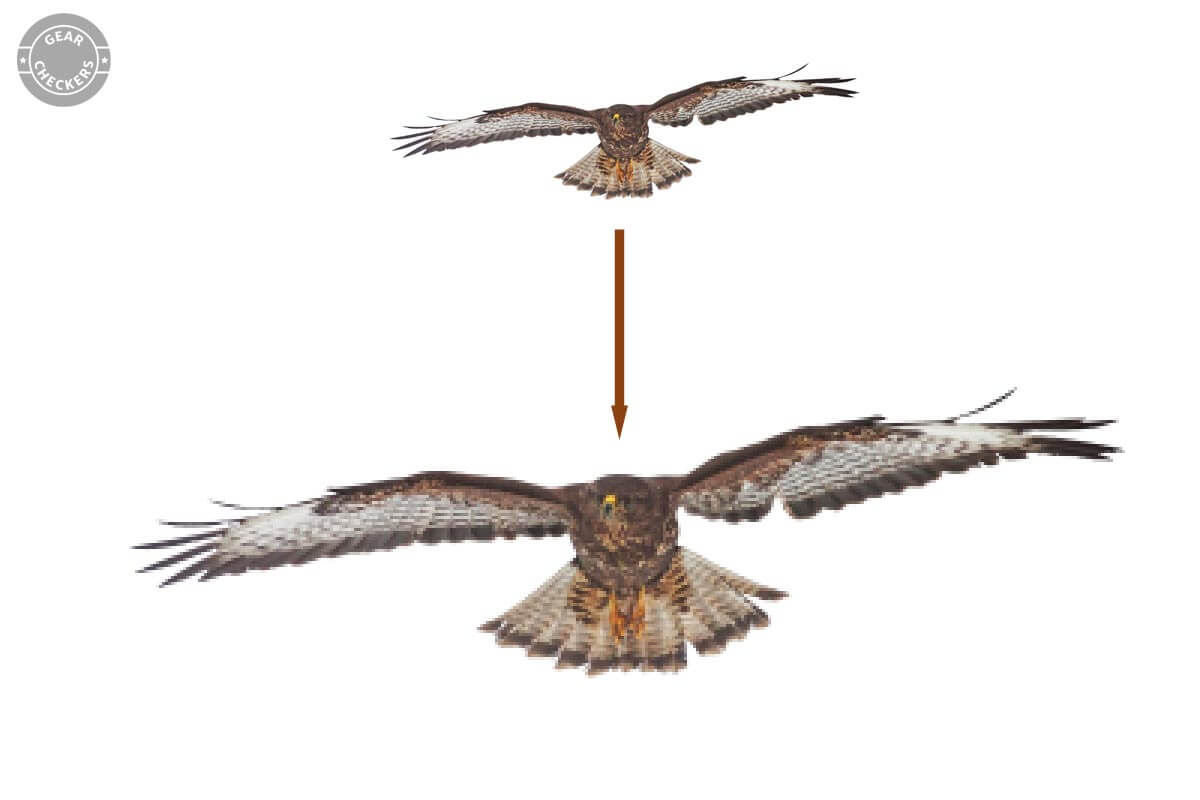
We can sometimes encounter a similar trick as seen in photos in video as well. Some manufacturers boast 4K video, but in reality, it is just digitally enlarged FullHD video. Once again, it’s just about making the parameters look better on paper.
Another phenomenon you may encounter with trail camera videos is choppy motion instead of smooth. The manufacturer might state that the trail camera captures video at 25 frames per second (the normal rate for smooth looking motion). In reality, however, the trail camera cannot capture that many frames, capturing only half the rate for instance. Instead it does a simple trick and adds each captured frame into the video twice in a row. This will achieve the advertised number of frames per second on paper, but the video will appear choppy.
Motion will appear choppy on lower quality trail cameras, even though on paper they have the same parameters as higher quality traps.
Trigger Speed
In order to save as much power as possible, a trail camera works in long-term power saving mode with only the motion sensor running. Once it detects motion, the camera and, night illuminator (if necessary), are initialized, and only then does the trail camera start taking pictures. This process normally takes only fractions of a second.
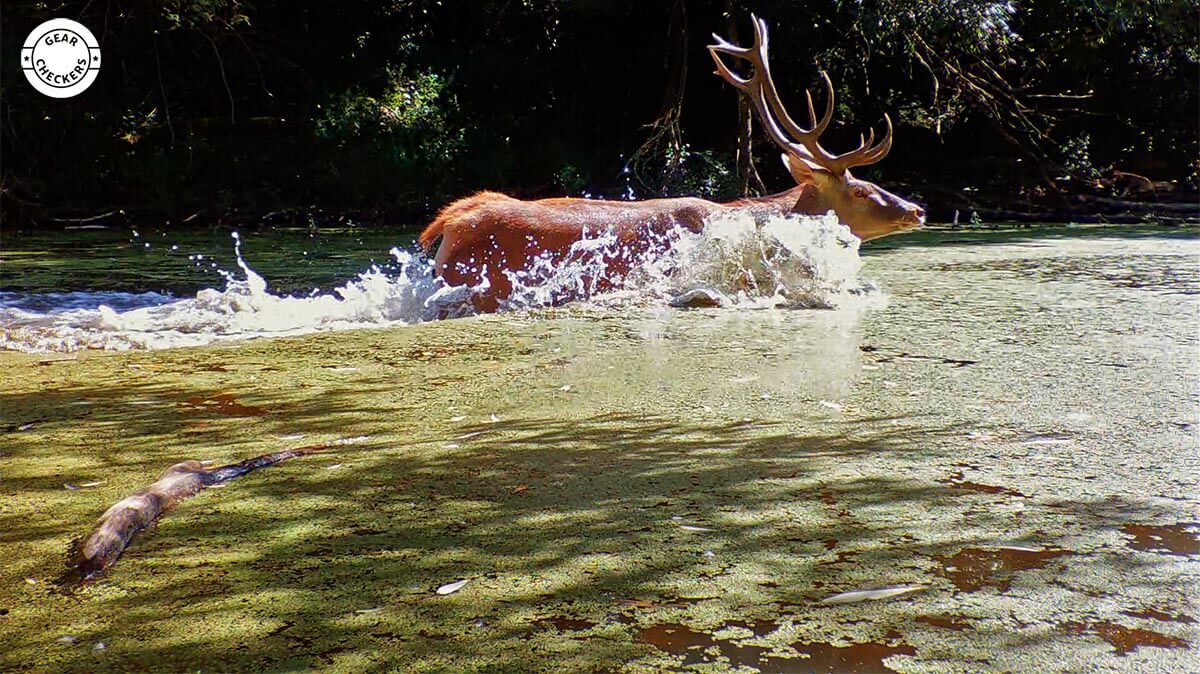
However, with fast moving objects, like animals running in front of the trail camera, even half a second can make the difference between the trail camera being able to capture them, or you only getting an empty photo on your memory card because the animal managed to run away of in the meantime.
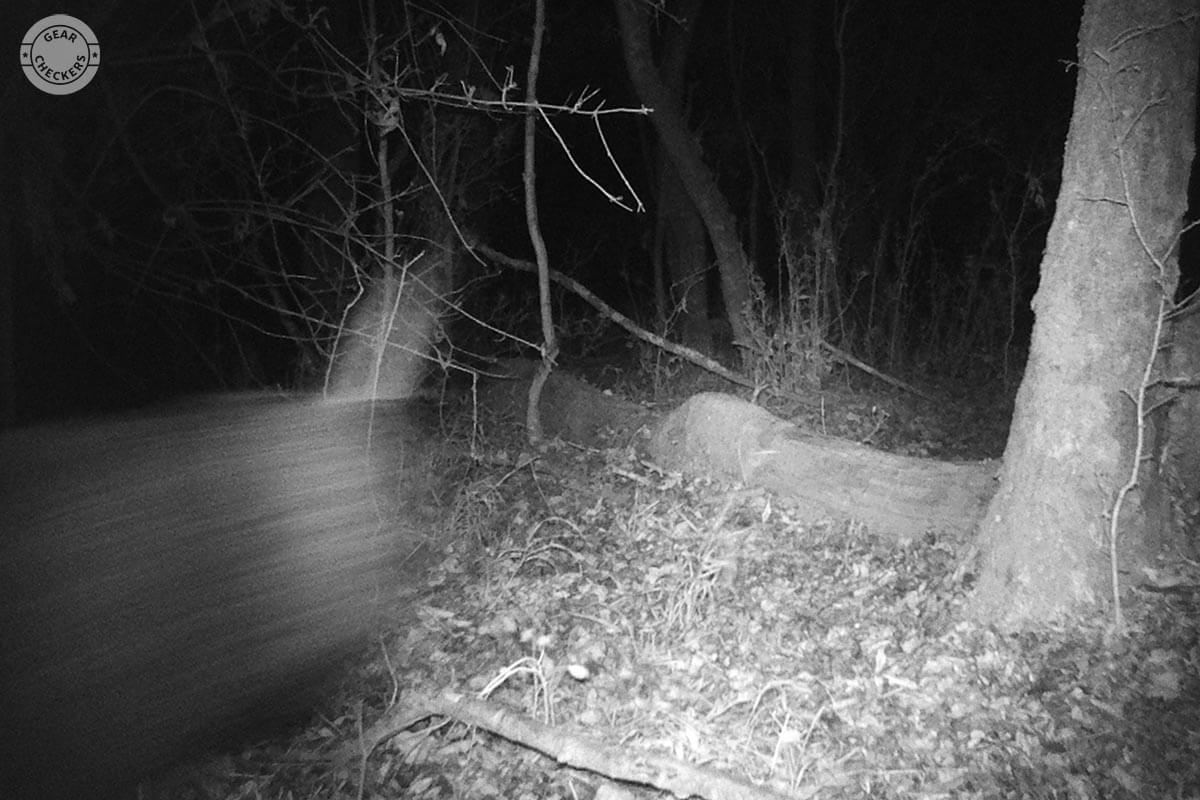
Some manufacturers are known to slightly tweak the trigger speed in the specs, which is why we test the response time of each trail camera we review in our lab.
Angle of View
Every trail camera has a small lens in front of the sensor that captures photos and videos. Just like the lenses on cameras and camcorders, the lens in trail cameras has its own optical properties. Of these, focal length is the most important for the angle of view, determining what kind of image the sensor can capture: wide- or narrow-angle. We can therefore think of the angle of view and the focal length as simply the field of view of the camera trap.
In practice, it means that some trail cameras have a narrower scope than others. This will make objects in photos appear larger, or, on the other hand, smaller, if the scope of the trail camera is wider.
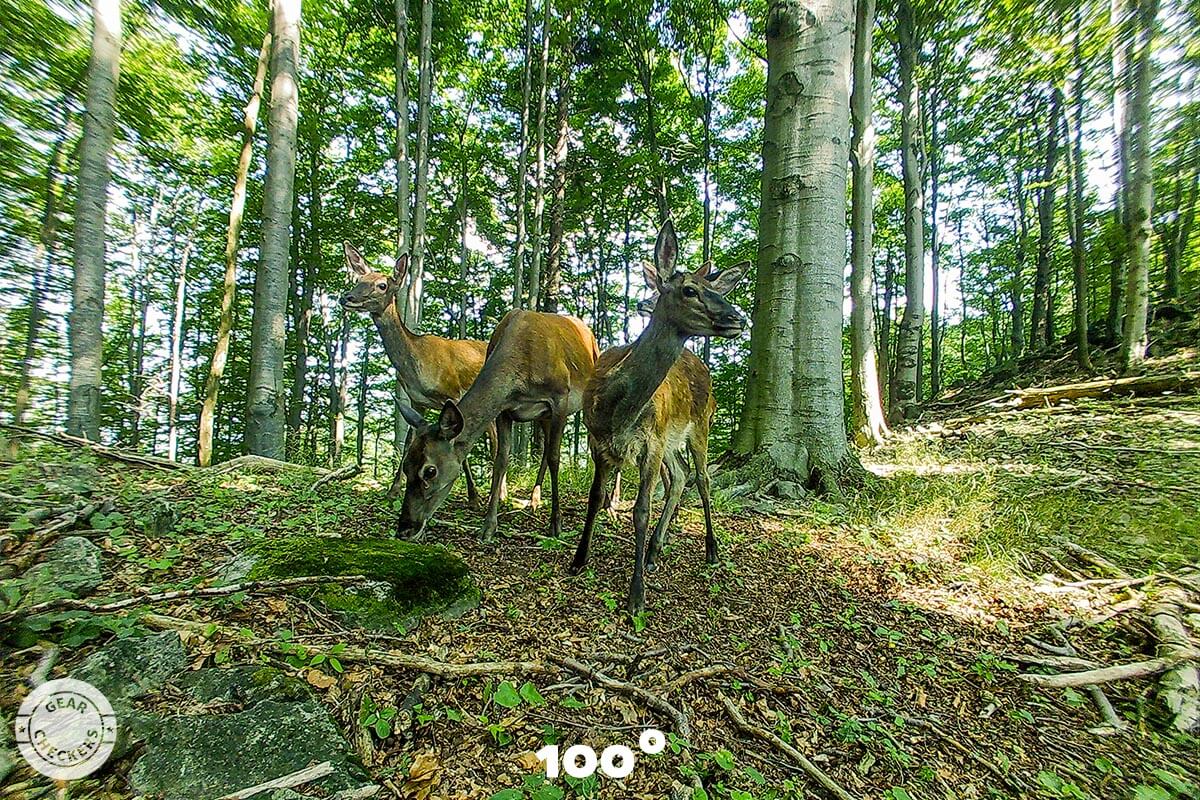
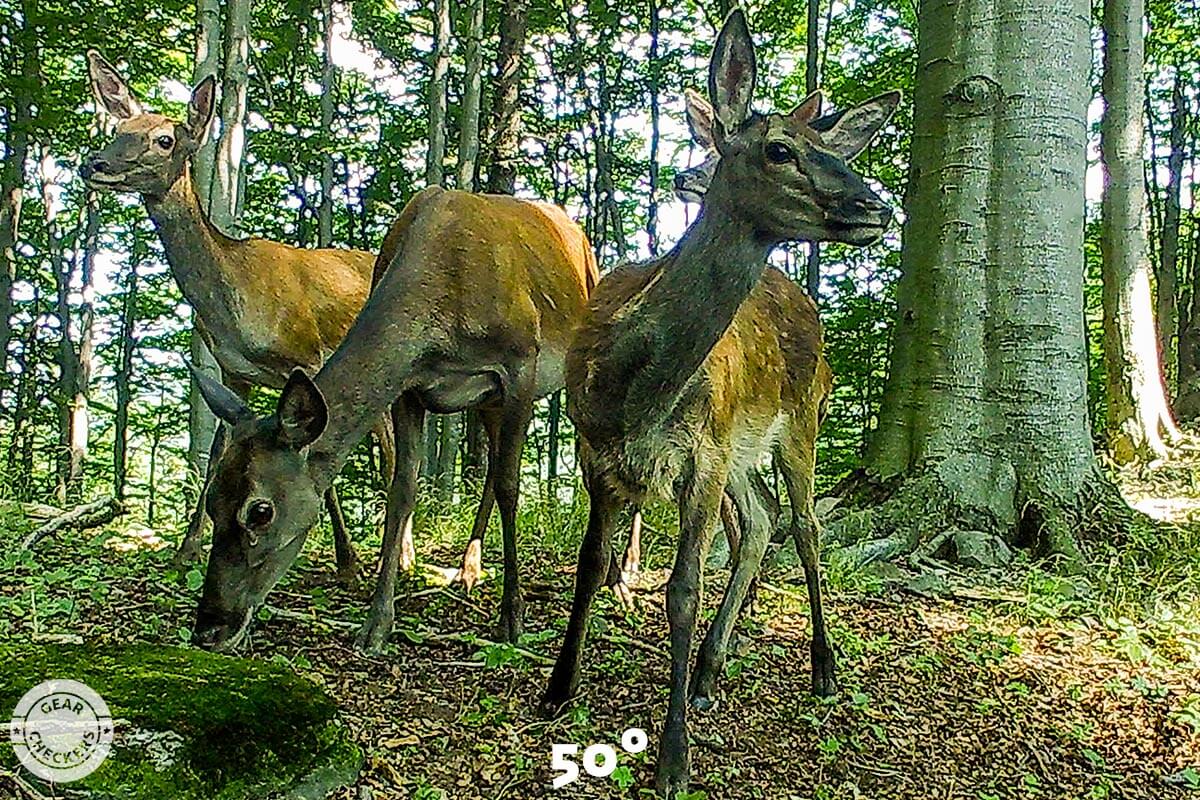
It is not possible to decisively state which is better or worse, rather it is important to know about this parameter and take it into account. For instance, if you need to monitor a wider area around your cabin because you want to know if someone has been by the front door or the car parked in the backyard, you may need a trail camera with a wider angle of view. On the other hand, if you are interested in the movement of animals through a clearing, say 15-20 meters from the nearest tree you can put the trail camera on, a trap with a narrower angle of view may be more appropriate.
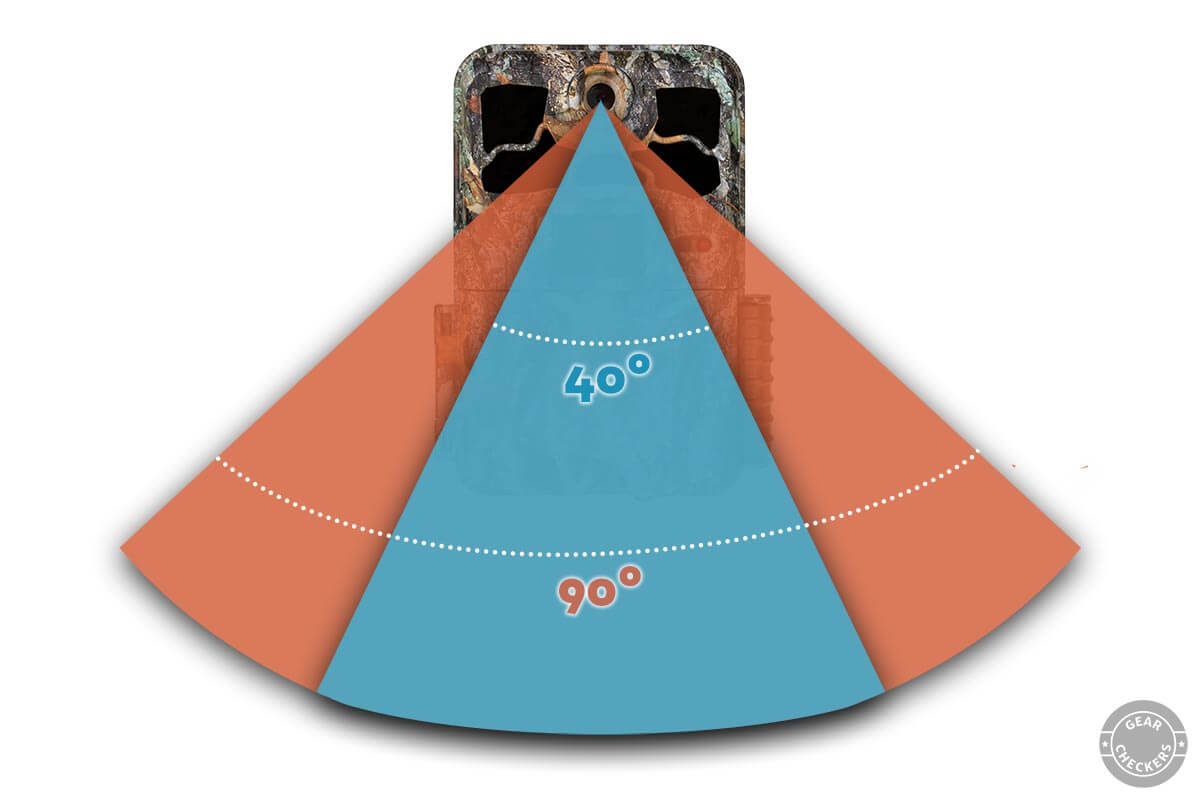
Detection Angle and Motion Sensor Range
We will talk about angles for a while longer. Another parameter that is good to be aware of and consider is the detection angle of the motion sensor that triggers the trail camera. When the object is moving beyond the edges of this angle, the trail camera will not trigger. It is possible for the detection angle to be too narrow, meaning the animal or person has to pass almost directly in front of the trail camera to trigger it.
Some models, on the other hand, have a detection angle greater than the angle of view, which may cause the trail camera to trigger in some cases, capturing an empty frame. This is because the object that triggered the trail camera is moving in the detection field of the motion sensor, but has not yet been in the field of view of the camera.
In addition to the angle, the range, i.e. the distance in which the motion sensor can detect motion, is also noteworthy. This distance is variable as it depends on the size of the object, the environmental conditions and also the speed at which the object is moving. The motion sensor detects fast moving objects that are significantly warmer than their surroundings most reliably.
Not every manufacturer specifies these parameters and even when they do, the measurement methodology varies, making it difficult to compare individual trail cameras. However, in our reviews you will find the values measured in our testing done in a consistent manner, enabling us to compare the trail cameras based on the results. This is one of the attributes we measure in our test lab for each trail camera.
Power and Covertness of the Night Illuminator
The night illuminator usually drains the most battery power, so manufacturers sometimes lower its power to make the trail camera last longer on a single charge. Its power can often adjusted in the menu, while more sophisticated models adjust the illumination intensity automatically based on how far the animal or the person being photographed is. However, every trail camera has a limit and if the object is beyond the range of the night illuminator, you will either not see it in the photo at all, or you will see the “glowing” eyes of the animal in the distance at best.
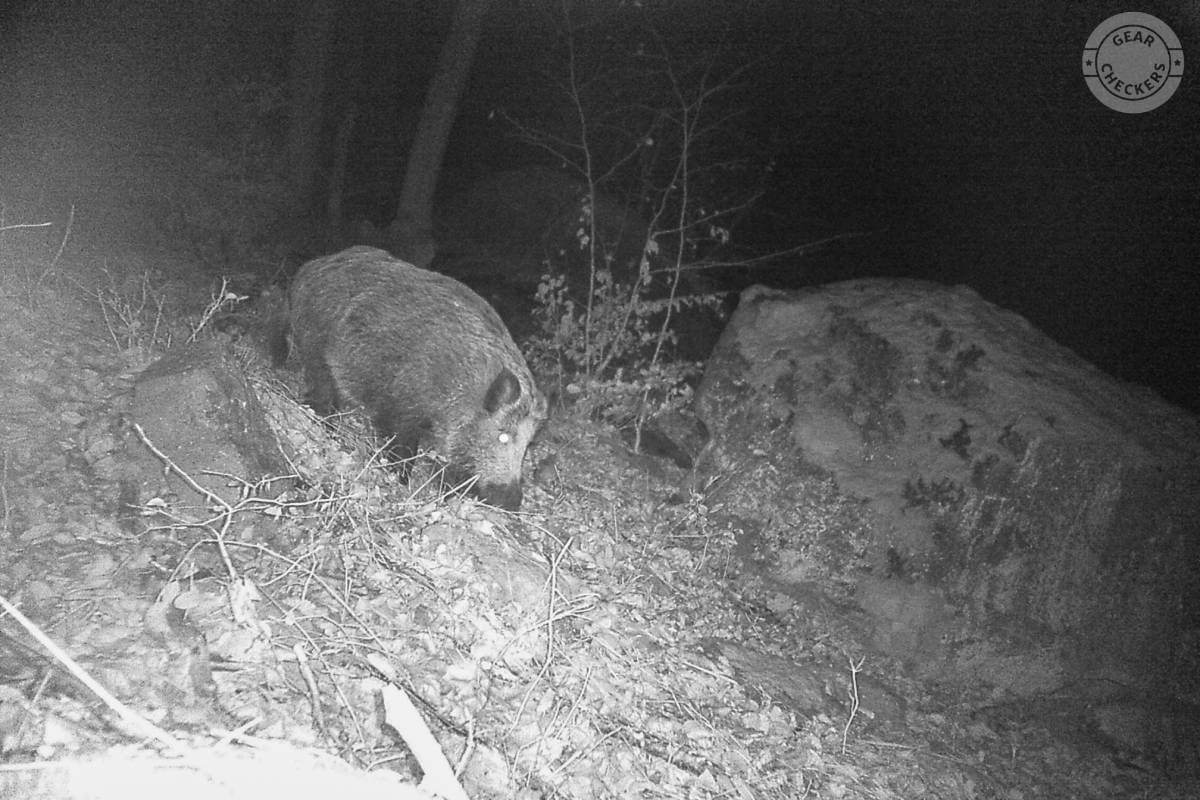
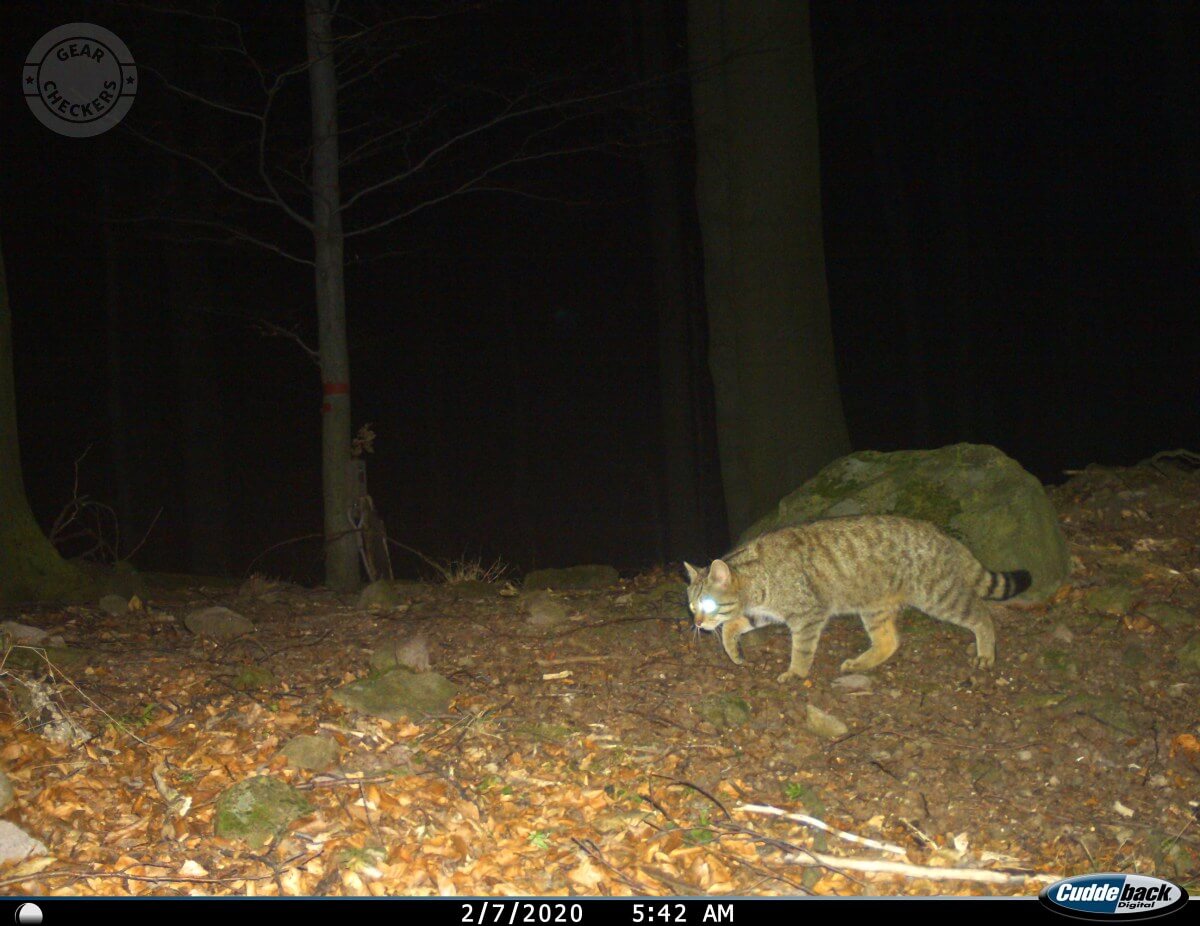
In addition to the power of the illuminator, the used technology used is also important. Some trail cameras use nearly invisible illumination (i.e. infrared spectrum only). This is a great advantage, because the trail camera will not be noticed by people or animals in the dark, avoiding the risk of detection or spooking the animal being tracked. Such illumination is often called “no-glow”.
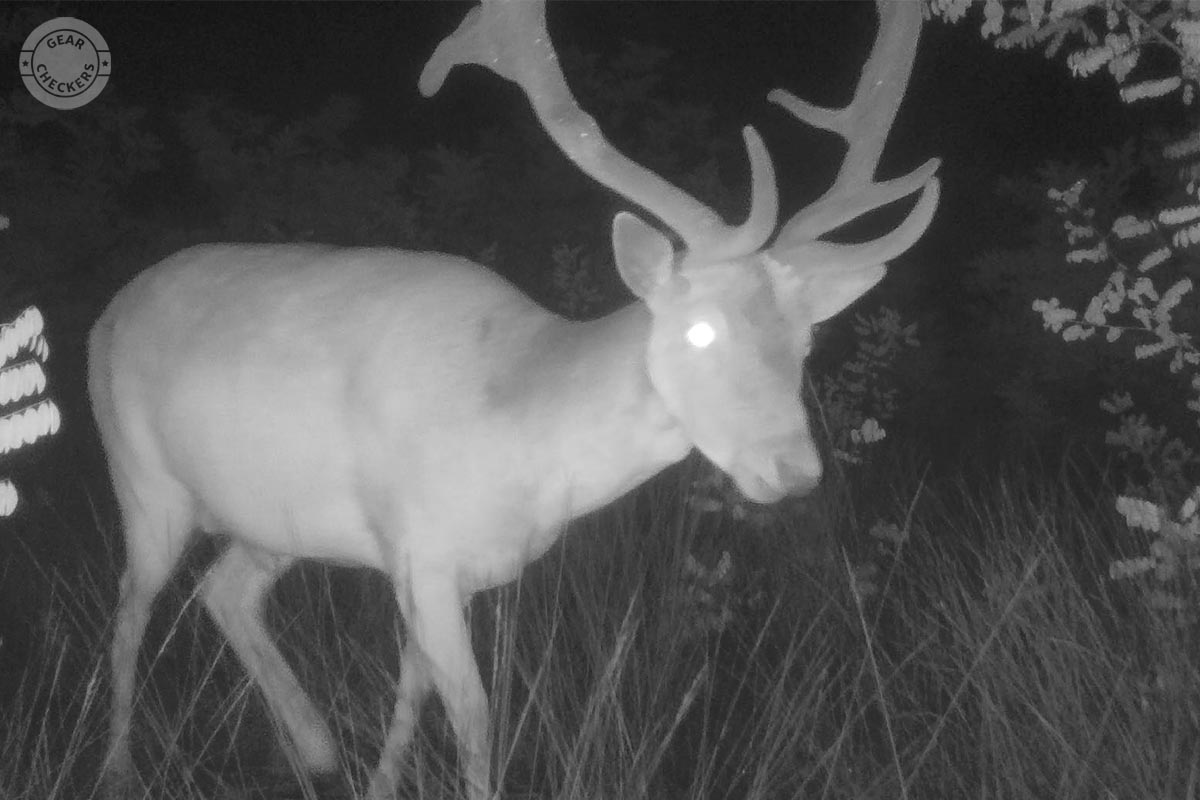
Other trail cameras use a different illumination technology. In part, it is in the invisible infrared spectrum, yet it also emits visible red light at the same time. This can be more or less intense, but once something starts flashing red in the woods after dark, it is almost certain to be noticed by people and animals alike. Some species, like wild boar, react to it calmly and remain largely undisturbed. Other more timid animals, like wolves, become alarmed however, and often opt to run away. Such illumination is known as “low glow” or “visible glow”.
Some animals react to the more visible night illuminator of the OMG H501 trail camera with caution.
All infrared illuminators have one thing in common, and that is the resulting night shots are black and white. If you need colour images also at night (for research purposes, for instance), there are trail camera models with white flash, like those on regular cameras. Animals surprisingly react more calmly to this flash than to visible “low glow” illumination. However, a person will be certain to notice the presence of such trail camera at night…
Price
Price is naturally one of the major parameters when deciding on a purchase. More expensive things are generally better quality, but this is not always the case in the trail camera segment. You can find models that look identical (they were likely made by the same factory somewhere in Asia), with one having objectively worse specs than the other, but it is often the worse one that costs twice as much. How is that possible? Higher price might evoke higher quality among shoppers. Combined with artificially inflated parameters that make the whole situation much more opaque, it is not easy to tell the good from the not so good.
We therefore also strive to evaluate the price/performance ratio in our testing. We think it’s fair to pay more for higher quality; after all, it’s we do in everyday life. However, we hate to pay more for less.
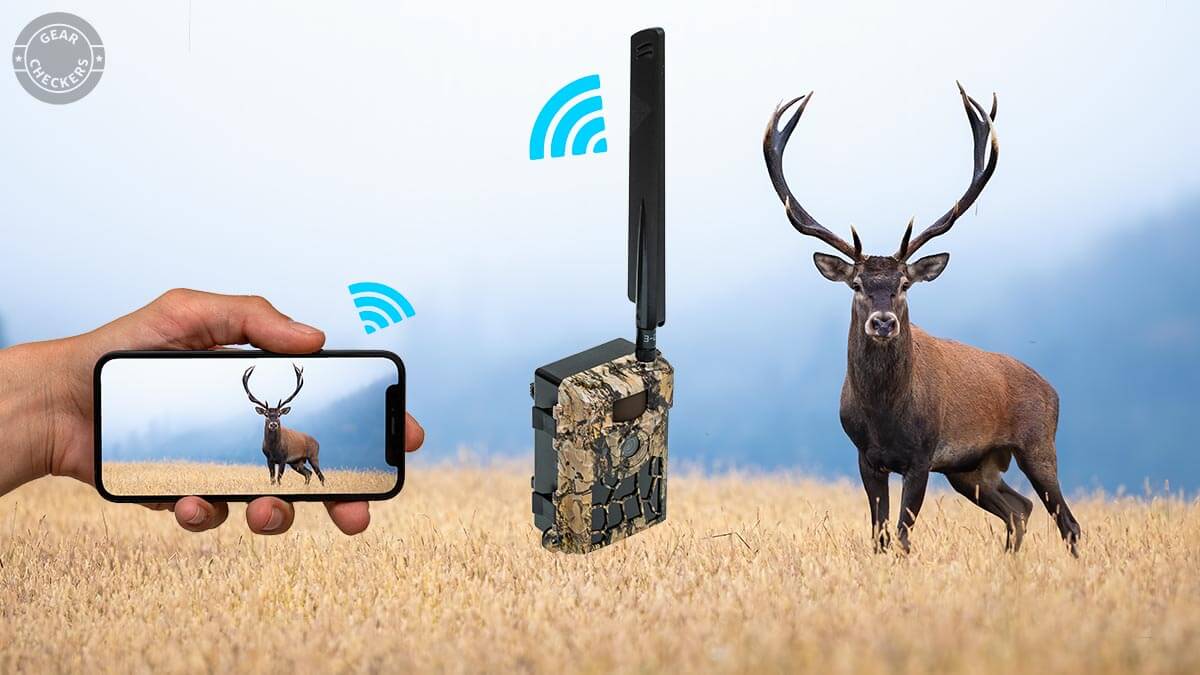
How to send photos from a photo trap directly to your smartphone?
Some trail camera models are equipped with a GSM module and a SIM card slot, allowing them to connect to mobile networks and send photos as soon as they are taken. This is most often either via MMS or email, with settings for one or more recipients in the menu.
For this to work properly, you need to insert a SIM card with a prepaid MMS or data package and place the trail camera in a location with network coverage. The advantage of such trail cameras is that their antennas are relatively powerful and work reliably even in locations where mobile phones have almost no signal. Network coverage can vary between providers, so it is a good idea to consider this well in advance when choosing a provider.
When using MMS trail cameras, you should also make sure they have presets for your country’s providers. The models that are localized to your market are very easy to set up. Simply insert the SIM card, the trail camera identifies the provider on its own and automatically sets everything up. However, if you buy an international model, the correct setup can become quite complicated.
How long do batteries in a trail camera last?
That’s a question with no simple answer. Trail cameras consume a small amount of power just by being in standby mode and waiting for the motion sensor to detect movement. Depending on the specific model, the batteries used and the outside temperature, it can last from several weeks to several months. There are even power-efficient trail cameras that can run for more than a year using lithium-ion batteries.
When a trail camera detects motion, it starts taking pictures or recording video. Of course, this consumes significantly more power than standby mode, and recording video consumes more power than taking photos in general.
Another increase in power consumption happens with the night mode, where the camera illuminates the scene with an infrared illuminator in addition to taking pictures. The biggest drain on battery life is recording night video. The most common symptom of nearly dead batteries in a trail camera is the shortening in the length of night video recording - the trail camera starts recording, the short-term battery voltage drops below the threshold and the trap shuts off.
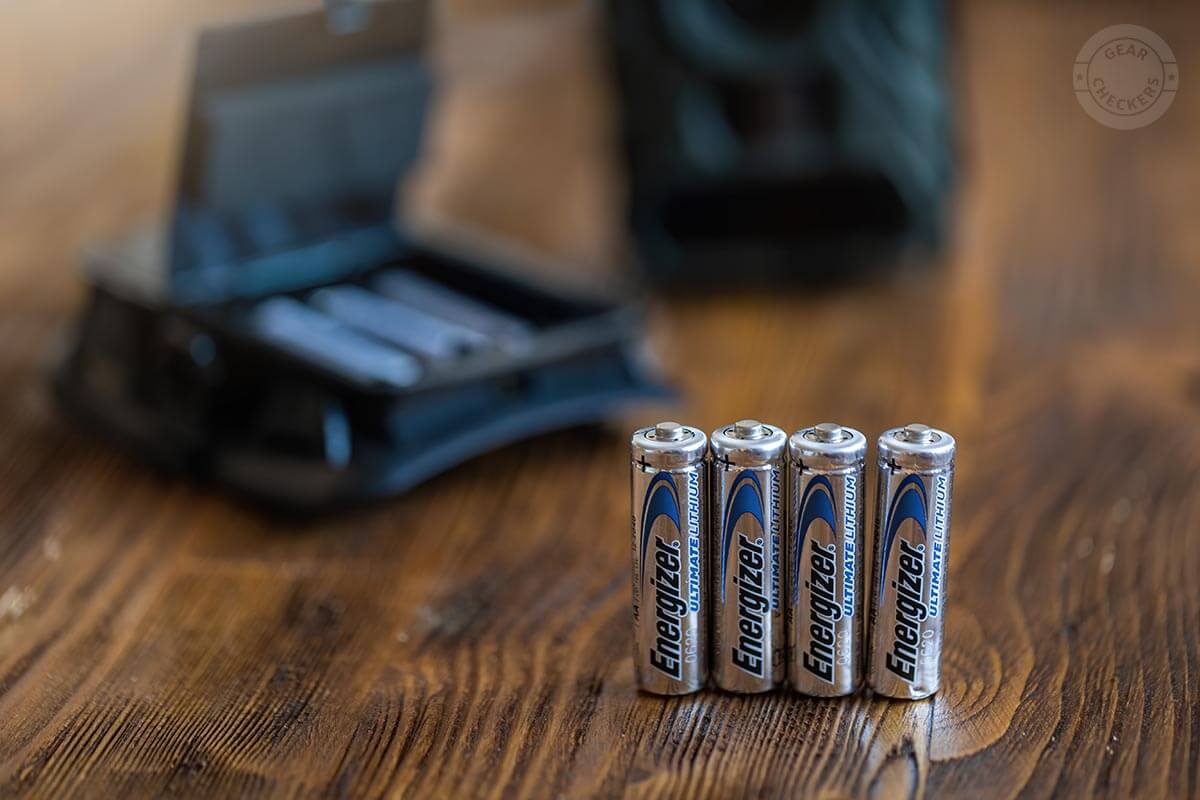
There are 3 main types of batteries that can be used in a trail camera available on the market. Everyone is familiar with the classic alkaline batteries. They are disposable and you can buy them nearly everywhere. They are also the most affordable. Their drawback is that they can’t be reused and have poor performance in freezing temperatures.
If you need your trail camera to last longer, you can use disposable lithium-ion batteries, which have a higher capacity than alkaline batteries, and also do not drop their capacity at low temperatures.
The last option is to use rechargeable NiMH batteries. Their main benefit is that you can recharge them at home and then reuse them over and over again. Their disadvantage is that they have a slightly lower voltage even when fully charged. When you use them in a trail camera, it may only come up to about 70% capacity. Still, they last long enough for most use cases, and using them may also be the most economical option in the long run.
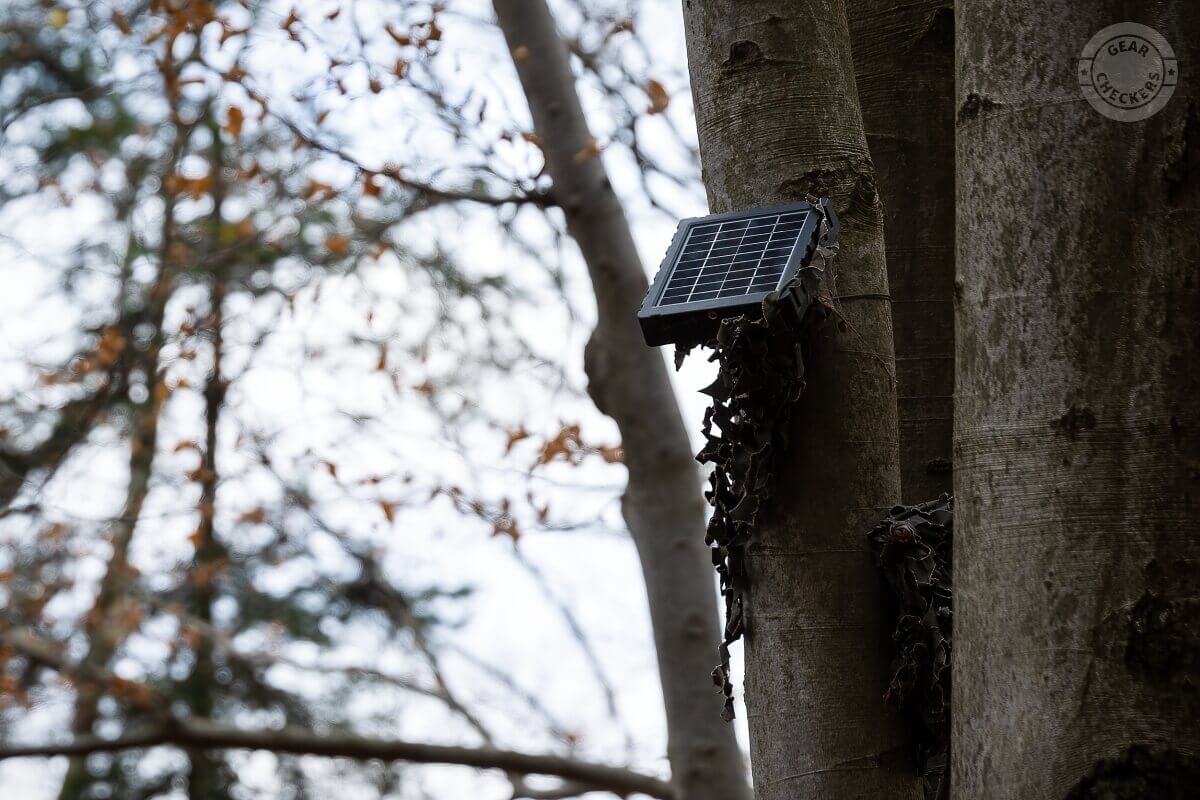
The 12V external power supply units or using a solar panel with a built-in battery are a separate chapter. This way, a trail camera can operate for a nearly indefinite time. You only need to make sure the solar panel receives sufficient sunlight.
How to choose the right memory card for your trail camera?
Trail cameras most commonly support SD or microSD memory cards to store the photos and videos they take. The details on the type of memory card to use can be easily found with each model. However, you should pay attention to the maximum storage capacity that each model supports. There are 3 main types relevant for this distinction - SD, SDHC and SDXC, or microSD, microSDHC and microSDXC.
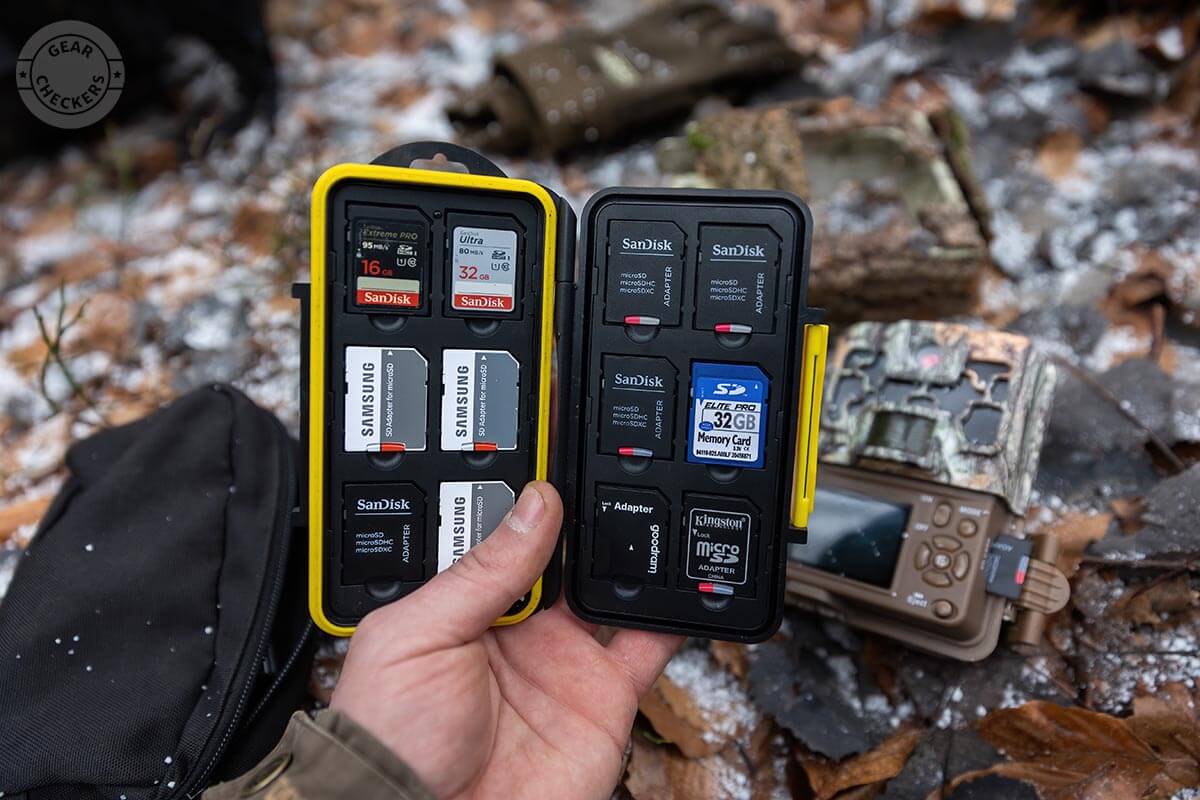
Regular (micro)SD offers a maximum storage capacity of 2GB and is relatively outdated by today’s standards. However, SD or microSD is often used to refer to the type of the card (thus also covering the other, SDHC and SDXC, standards).
SDHC and microSDHC memory cards have a maximum capacity of 32GB - which is also the limit that most trail camera models on the market support today. You very likely can’t go wrong with an SDHC card, and it should work with virtually all trail cameras.
SDXC memory cards can have capacities of up to 2TB, although you’ll see capacities of around 64GB or 128GB more commonly, and sometimes 256GB to 512GB. However, only select trail cameras are compatible with these high-capacity memory cards. If you insert one into a model that doesn’t support the SDXC standard, the trail camera either won’t recognize it at all, or it will display an unsupported card type error. These cards are especially useful if you want to use the trail camera to record video, where a larger volume of data will be produced, and you don’t want the memory card to fill up after only the first few days in the field.