Published at Jun 19, 2023
How does a Trail Camera work? A graphic explanation with examples
Trail cameras contain a motion sensor, which captures a photo or video when an animal or human moves in front of it. Trail cameras work both day and night, utilizing night illumination in the dark. The captured footage is saved to a memory card, or sent to a mobile device.
Trail cameras have become a frequently used tool in recent years. However, there are many misconceptions about how they work. Properly understanding how they operate can help you get the most out of your trail camera.

Article Overview
What is a Trail Camera
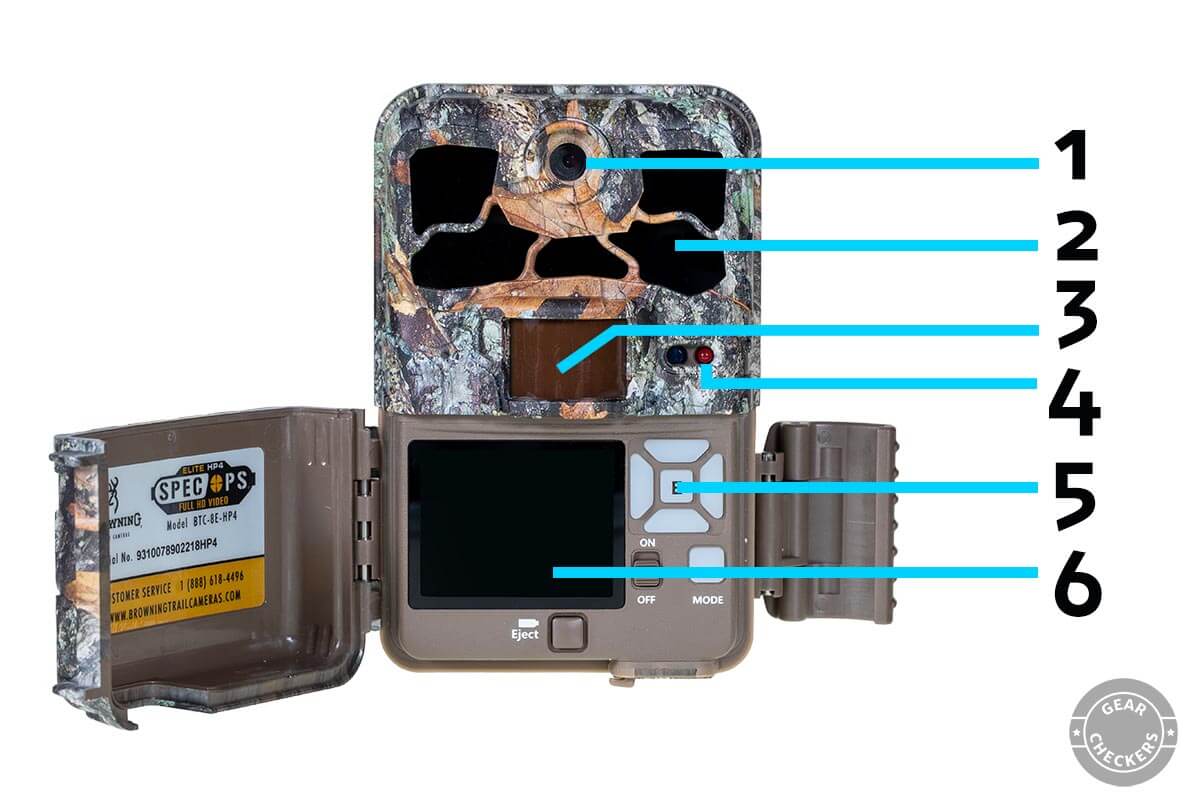
A trail camera, also referred to as a game camera or hunting camera, is an automated device designed for monitoring wildlife or humans. It’s typically deployed in outdoor settings, but can also function indoors. The key components for its operation include a camera, PIR motion sensor, and infrared flash. These trailcams are battery-powered but can also be connected to an external power source such as a battery pack, solar panel, or directly into the power grid. Captured photos and videos are stored on a memory card (SD card). If equipped with a cellular module and a SIM card, the game camera can transmit images via the cellular network to a phone, email, or cloud storage.
Hunting cameras are mainly used for wildlife tracking and property surveillance. However, they can also be used for vandalism prevention in urban settings, verification of protected wildlife species presence, as a home security camera, or a time-lapse camera.
How a Trail Camera Works
Trail cameras are used to monitor a specific location within their field of view. Since they’re most commonly powered by AA batteries and use memory cards with finite storage, they can’t record non-stop. If they did, the batteries would deplete within a few hours.

That’s why, after being activated by the user, the game camera switches to standby mode, where only the PIR motion sensor works, using a negligible amount of energy. When the sensor detects a change in the thermal image within its field of view (for example, an animal appears), the camera turns on, takes a photo or video, and then switches back to standby mode.
How a PIR Motion Sensor Works
In simplified terms, it can be said that a trail camera is sensitive to moving heat. When something living moves in front of it, it triggers. To avoid false alarms and empty shots, it’s good to know in more detail, how a PIR motion sensor works in a trail camera.
The acronym PIR comes from passive infrared sensor and denotes a passive sensor sensitive to infrared radiation. Infrared radiation has a longer wavelength than visible light, so it cannot be detected by the human eye. We typically perceive it as heat in everyday life.

All warm objects emit infrared radiation, in nature these are most often animals or humans. However, it could also be twigs heated by the sun or warm air.
Since the trail camera is static, firmly installed on a tree for example, the PIR sensor only needs to evaluate changes in the intensity of incoming infrared radiation in different parts of the observed scene. If, for example, an animal walks in front of the trail camera and behind it are trees heated to air temperature, the PIR sensor will register a temperature change between the environment and the animal’s temperature and back to the environmental temperature. The sensor evaluates the degree of change, and if it exceeds a certain value (sensitivity threshold), the trail camera switches from power-saving sleep mode to active recording mode.
The trail camera evaluates differences in captured temperatures in different parts of the observed area as an alert and begins taking photos or recording video.
Capturing Animals of Various Sizes
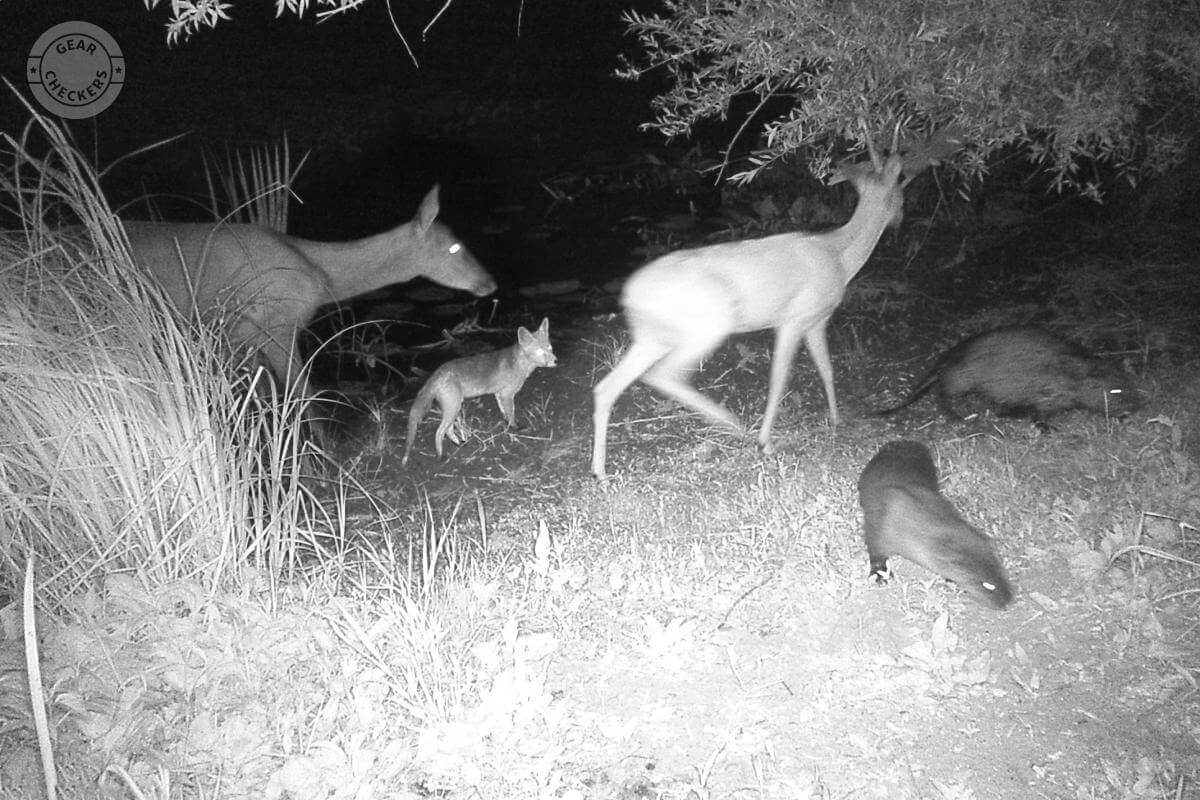
The PIR sensor cannot distinguish the size of the animal - it “sees” only thermal maps. This means that a mouse or squirrel close to the trail camera can trigger it, just as a large deer that is much farther away can. What matters is how much heat reached the sensor. If the animals are too far away, the trail camera cannot thermally distinguish them from the environment, and therefore it won’t trigger.

Maximum Range of the Trail Camera Motion Sensor
From the principle of operation of the PIR sensor, it follows that the maximum range at which a trail camera can detect movement depends on two main factors:
- Size of the animal or person (the area that emits IR radiation)
- Thermal contrast compared to the surroundings
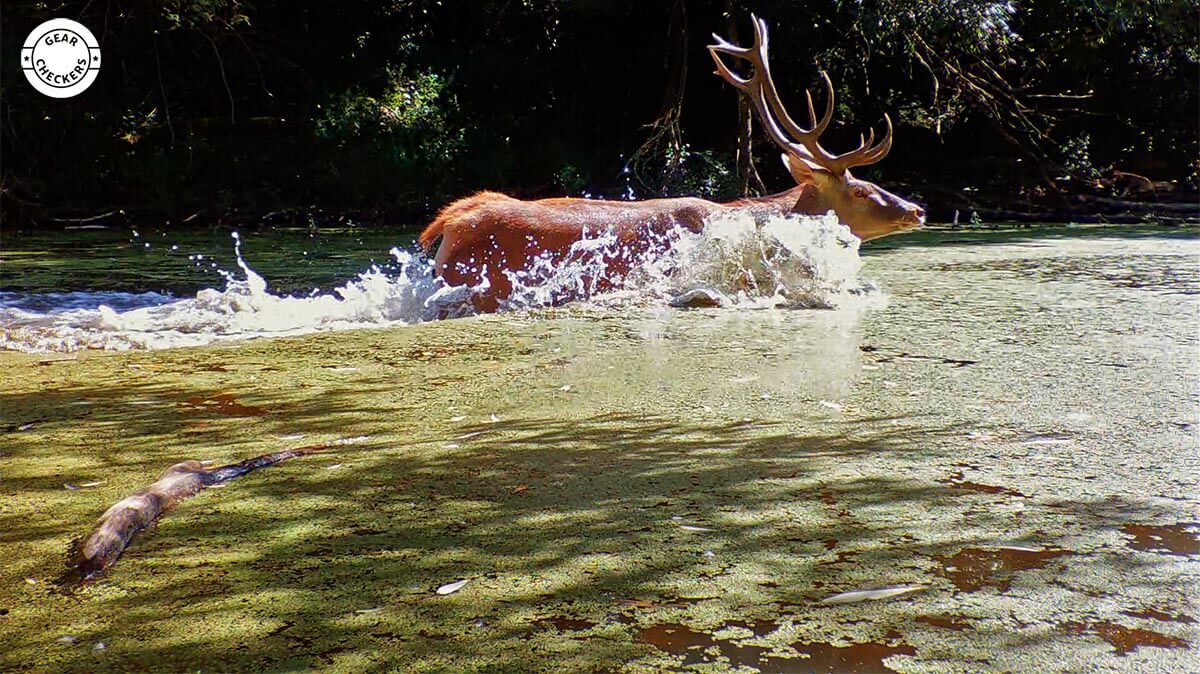
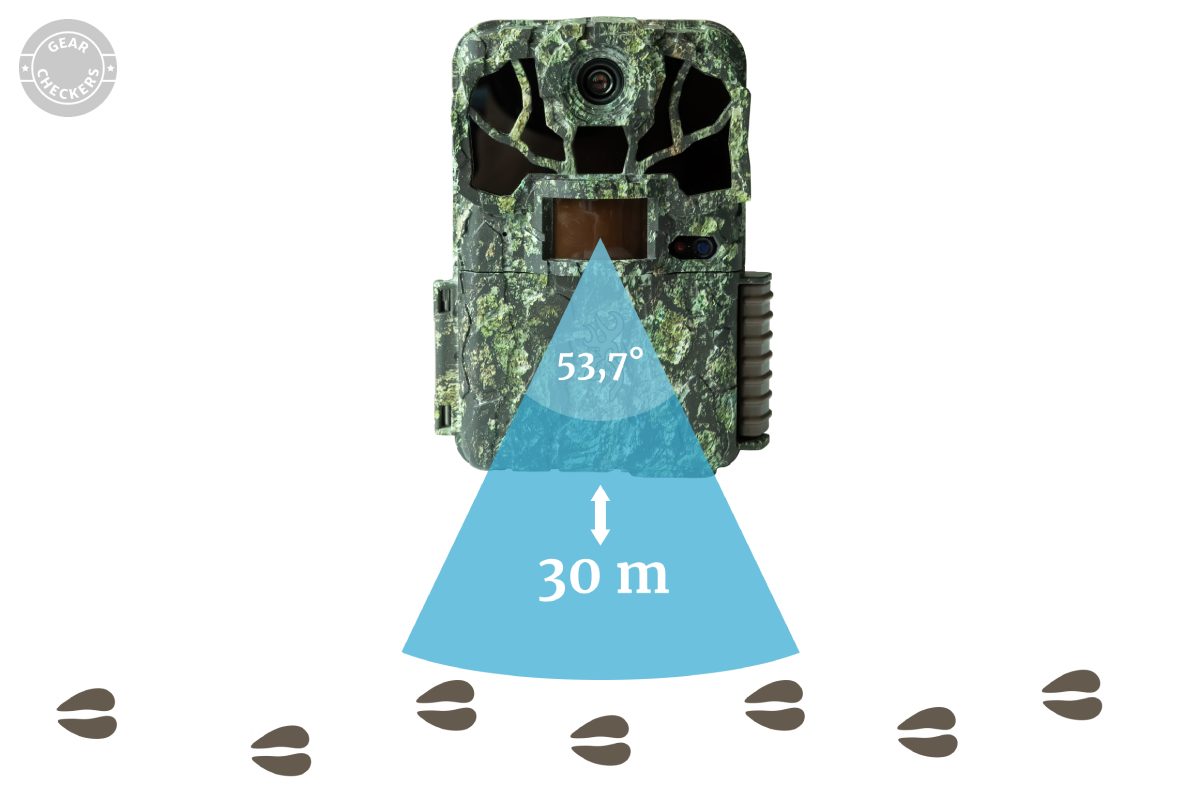
If the animal is large and the environment is cold, the trail camera might be triggered even at a distance of 100 - 130 feet (30 - 40 meters). A typical example of such a situation would be a heated deer during a cool morning in rut. If the animal is smaller and the environment is almost the same temperature, it might happen that the trail camera triggers late or not at all. Such conditions primarily occur during hot summer days, when the temperature of the air and the environment is almost the same as the surface temperature of the animals (fur acts as an insulator, so we are not talking about body temperature).
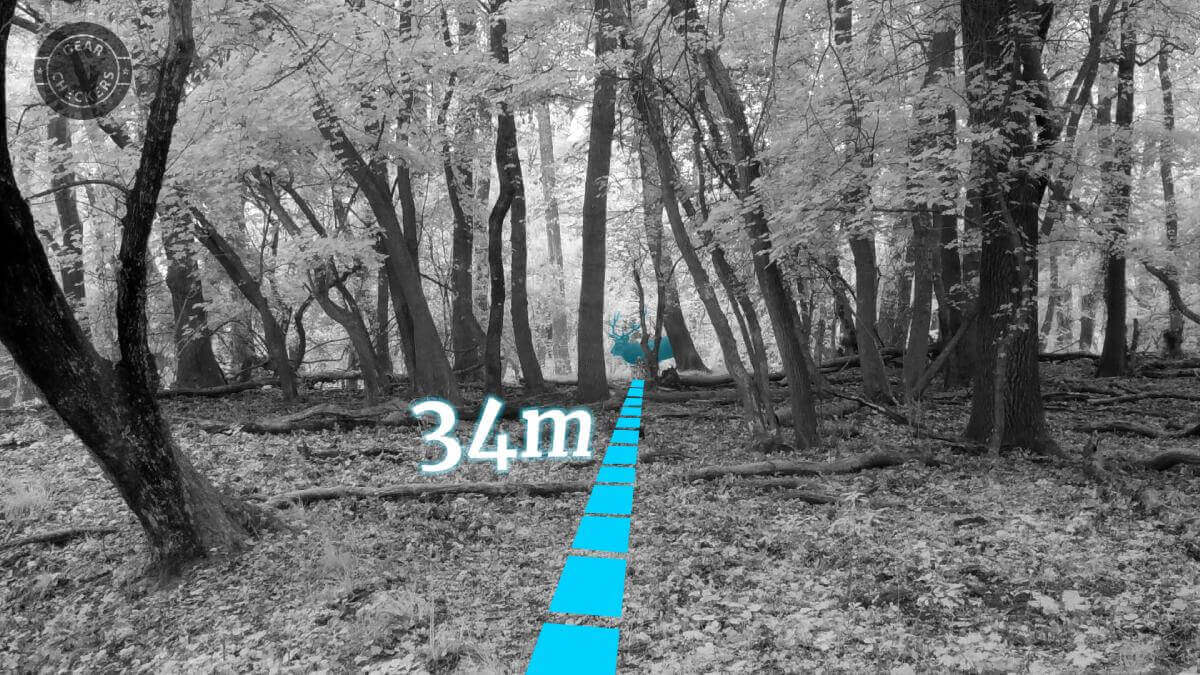
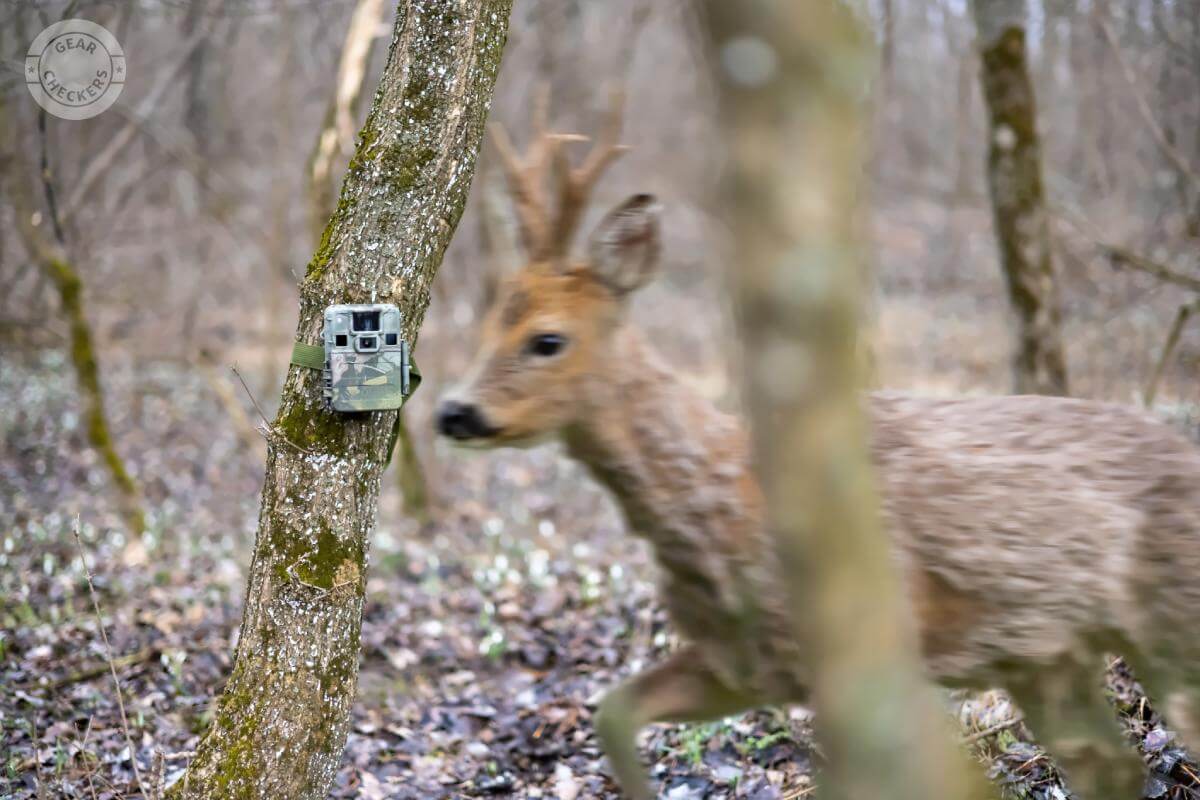
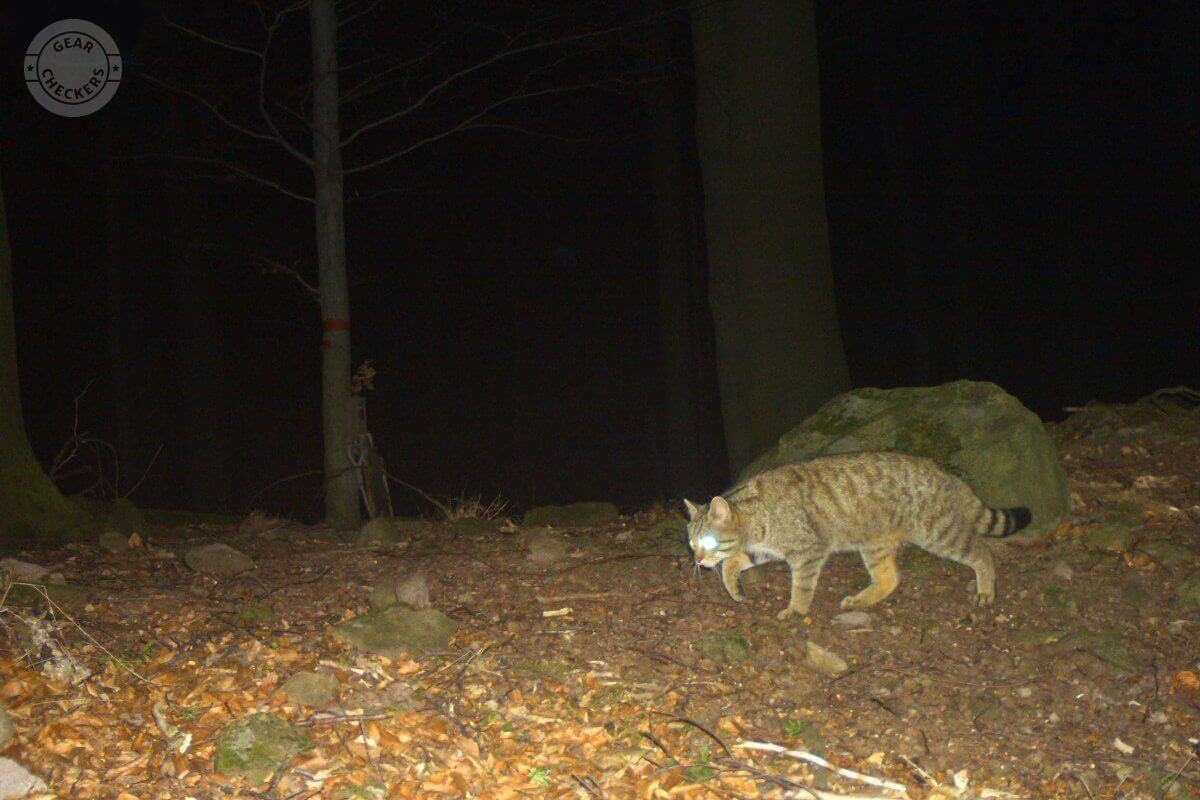
A deer heated up during rut on a cool morning triggered the trail camera even at a distance of 111 feet (34 meters). Trail Camera Browning Spec Ops Elite HP4.
In order to adapt to seasons and the size of the animals we want to capture on the trail camera, most trail cameras allow us to set the sensitivity of the PIR sensor - usually in 2 or 3 levels. In principle, the lower the PIR sensitivity, the shorter the distance the trail camera captures the same animal. As we explained in the previous sections, this also depends on the temperature of the environment and other circumstances.
Very simply, if you expect large animals (deer, wild boar) in front of the trail camera, you can set a low PIR sensor sensitivity - large animals will still trigger the trail camera and at least you won’t have a full card of mice or birds. For medium-sized animals (roe deer, fox) set a medium motion sensor sensitivity and if you want to observe small animals (small birds, hedgehog, squirrel) set the highest PIR sensitivity in the menu.
Sun, Wind, and Branches: The Most Common Causes of False Alarms
From the principle of operation of the PIR sensors, which are found in trail cameras, it follows that there are situations that can “deceive” them - the trail camera does not see the world as people do, therefore it cannot distinguish whether it is a moving animal that is warmer than the surroundings, or just a leaf lit and heated by the sun, which is equally warmer than the surroundings.

Quite often we have encountered situations where people complain that their trail camera is faulty because it captures hundreds of photos each day, yet there are no animals in sight. Upon analyzing the images with them or visiting the site where the trail camera was placed, we usually find these problems causing such situations:
- Vegetation (grass, leaves, branches), relatively close to the trail camera (within 10 feet), that warms and moves during sunny and windy weather. The trail camera interprets this as motion, causing it to trigger continuously.
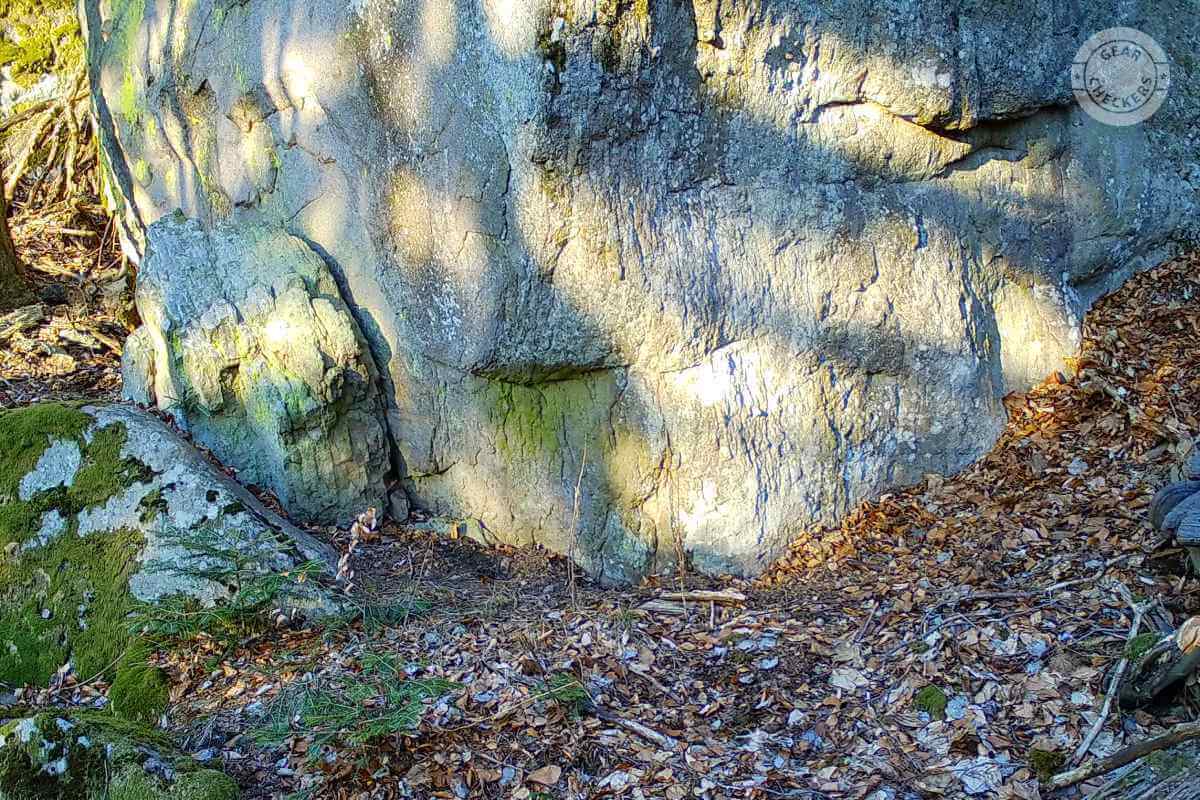
- There is a relatively large surface area in front of the camera (a rock, a steep slope), oriented southward and therefore heated most by the sun. The heated object and warm air rising from it also emit infrared radiation, to which the motion sensor is sensitive. When a gentle breeze moves the warm air, the trail camera may interpret this as movement and trigger.
- Sun shining directly on the trail camera - the sun is, of course, a significant source of heat (IR radiation). If the trail camera is set up so that it faces the sun at any part of the day, rays of light passing between branches, grass, or clouds can cause the camera to trigger on its own.
What can be done to eliminate false alarms? The best course of action is to set up the trail camera so that there are no branches or grass in front of it that could move in the wind. It is also crucial to avoid orienting the trail camera to the south (to prevent direct solar radiation from hitting the PIR sensor). If there’s no other option and you need to place the camera where false alarms may occur, we recommend reducing the sensitivity of the PIR motion sensor.
Do all trail cameras respond to false alarms in the same way? Even though the same technology is used in all trail cameras to detect motion, in practice we can see significant differences between individual models - some trail cameras tend to trigger on false alarms almost in every situation, while others often surprise with a minimum of “empty” shots even under very challenging conditions. In this respect, we have consistently found Browning trail cameras to be the best performers, with a well-developed trigger logic and minimum false alarms.
Trail Cameras May Miss Fast Movements
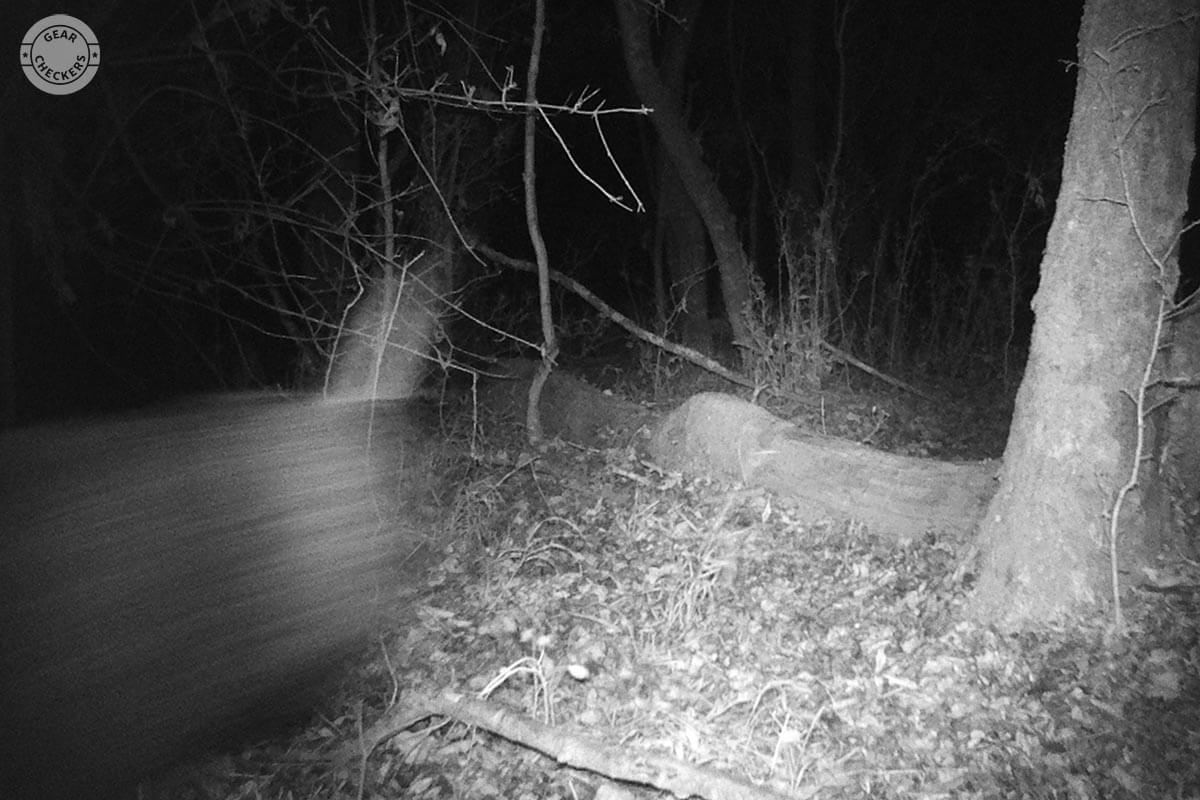
There’s another aspect worth realizing to better understand how a trail camera works. As the trail camera is consistently in power-saving mode to conserve battery life, it fully wakes up only after detecting motion. This can result in the camera waking up too slowly and by the time it starts capturing, the animal may be out of the frame. This is especially true for fast-moving animals and slower trail cameras. We’ve encountered trail cameras that took more than 1.5 seconds to trigger. Conversely, we’ve tested models with a record-breaking trigger speed of 0.12 seconds.
If you only have access to a slower trail camera, it’s better to place it in a location where you expect the animal will linger longer - a food source, water, or a resting spot. If the animal spends a few minutes in front of the trail camera, it doesn’t really matter whether the camera’s trigger time is longer or shorter. Conversely, you can deploy faster trail camera models even in areas where game simply runs by; the trailcam should still be able to capture it.
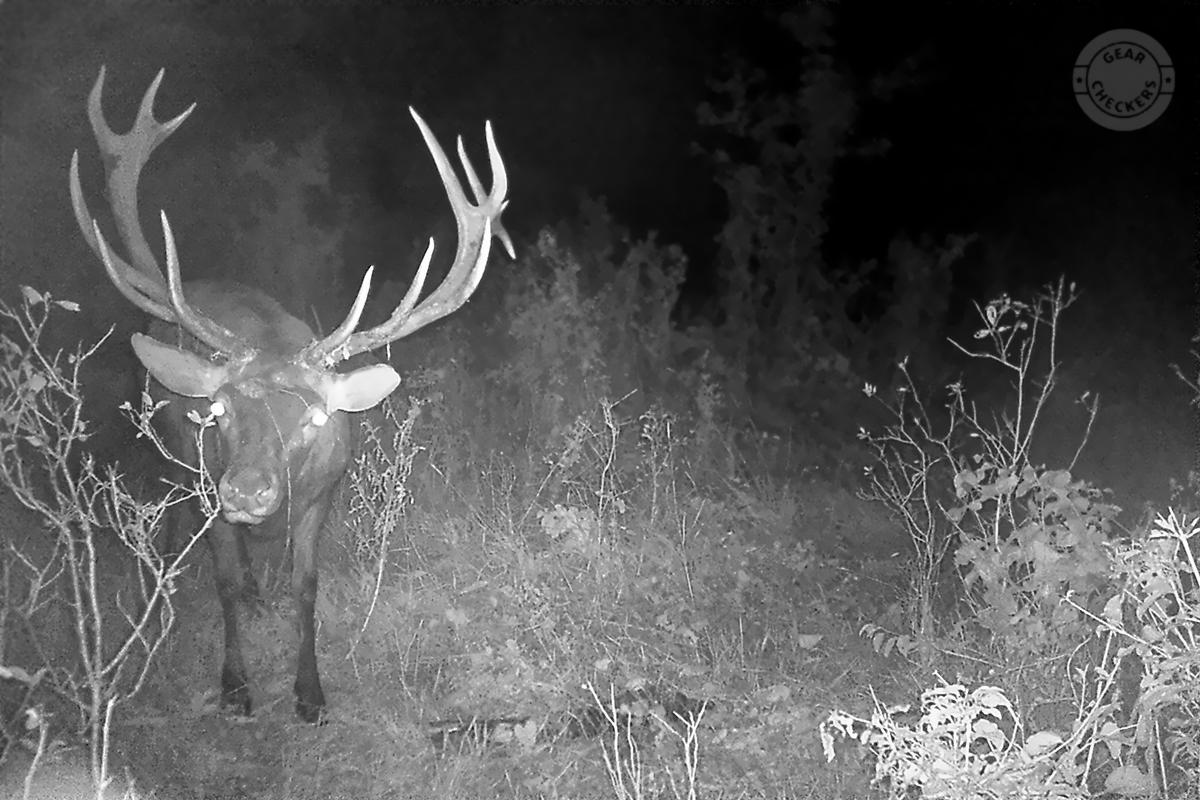
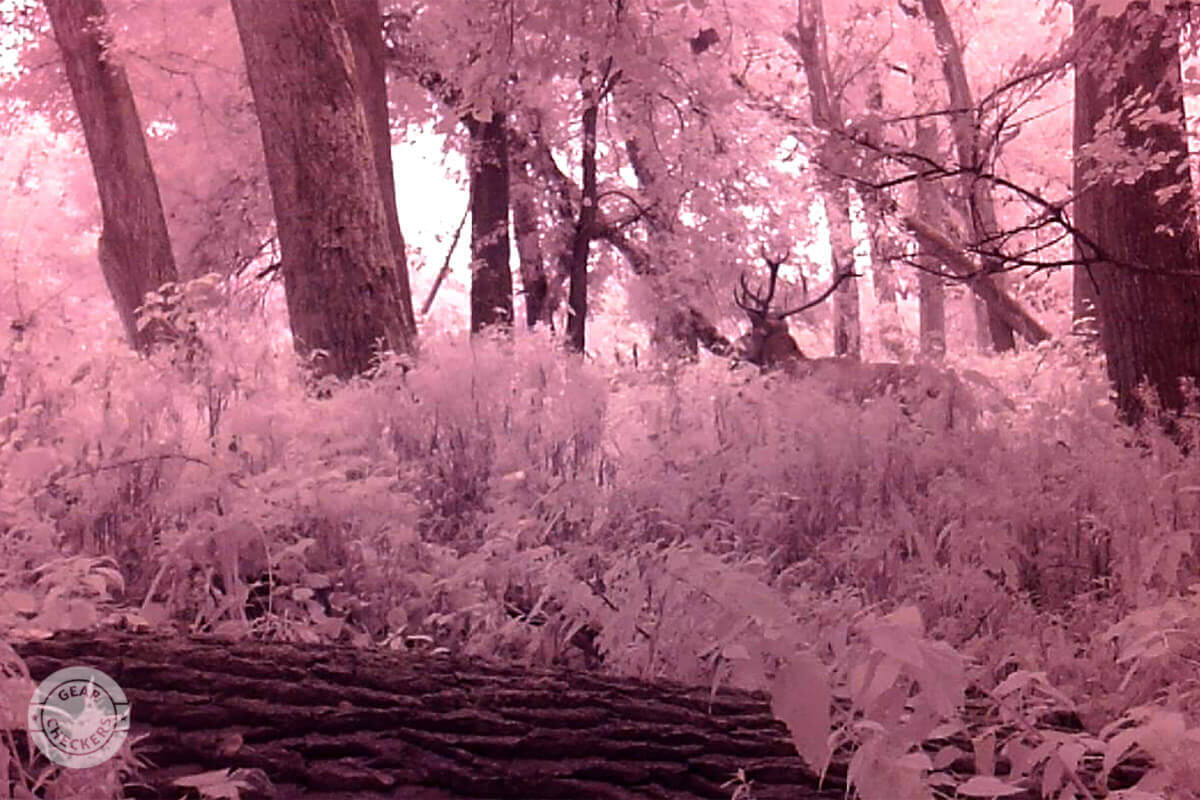
Thanks to a short trigger time, even quick movement in front of the trail camera won’t be missed. This shot was taken with the Browning Spec Ops Elite HP4, which has a trigger time of only 0.12 seconds.
Motion sensor “sees” differently than a camera
With a trail camera’s motion sensor, it’s important to note a few things - a motion sensor has a certain range and detection angle.
The fact that something is visible in the resulting photo does not necessarily mean that the trail camera is capable of motion detection at that spot. This is due to the fact that the PIR sensor operates on a different technological principle than the camera and has a specific range. Therefore, if the animal is too far away for the motion sensor to detect, the trail camera will not record anything. If you then find fresh tracks at a spot that is visible in the photos, but is out of the motion sensor’s range, you might feel that your trail camera isn’t working. However, you have just encountered the technical limits of your trail camera - in the future, you could try to increase the sensitivity of the PIR sensor in the menu, or move the trail camera closer.
The motion PIR sensor may have (and usually does have) a wider detection angle than the camera’s field of view. This is primarily to give the trail camera enough time to trigger.
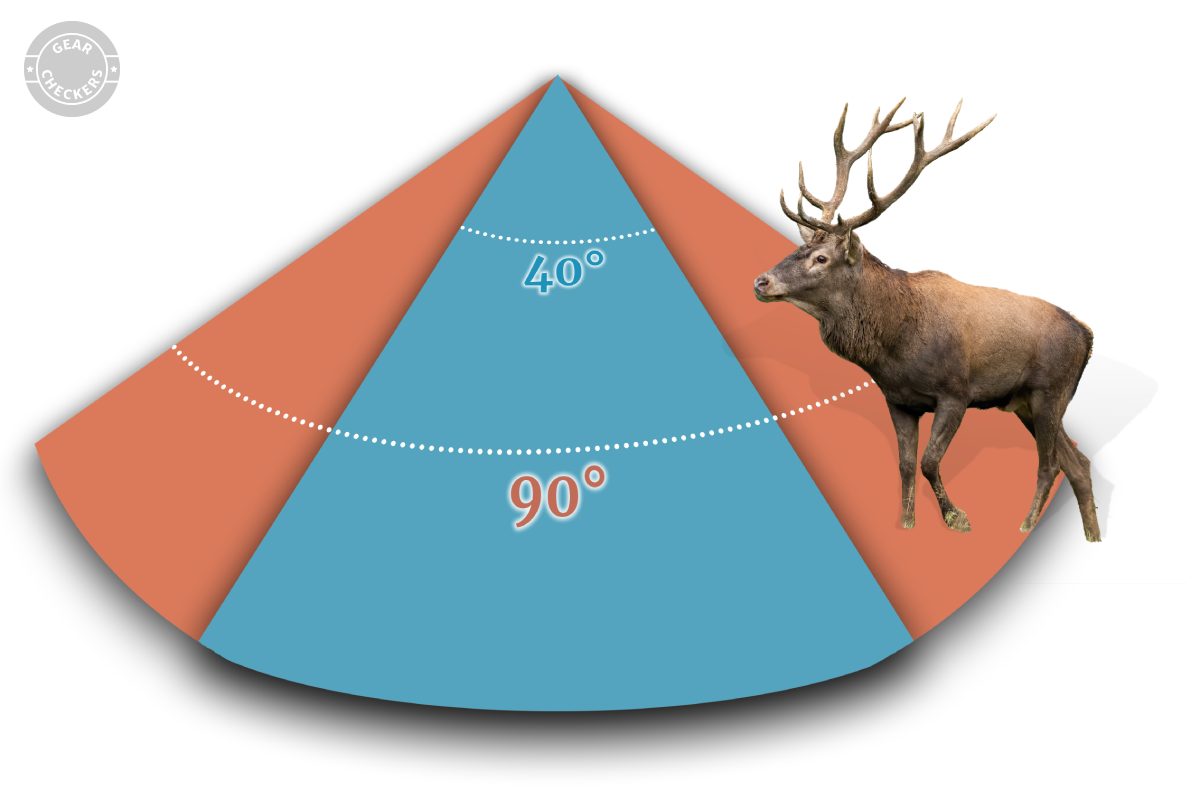
Therefore, in specific cases, it can happen that the trail camera triggers, but there is nothing in the shot - the animal indeed entered the detection angle of the PIR sensor, but then stopped, or turned around, and therefore did not enter the camera’s field of view. These situations are most likely to occur with trail camera models that have additional motion sensors. This increases the chance of early detection of incoming animals, but also leads to blank photos and false alarms.
How the Night Illumination of a Trail Camera Works
Once the motion sensor is activated, the trail camera determines whether it is day or night either by using the camera itself or a lux meter (a component used for measuring the amount of light). If it triggers during the day, it immediately starts taking photos or recording videos. If the trail camera is activated at night, it also switches on the night illumination to light up the scene in front of it.

There are three types of night illumination that you can find in trail cameras. Each of them has its own advantages and disadvantages. Depending on the technology used, we distinguish between:
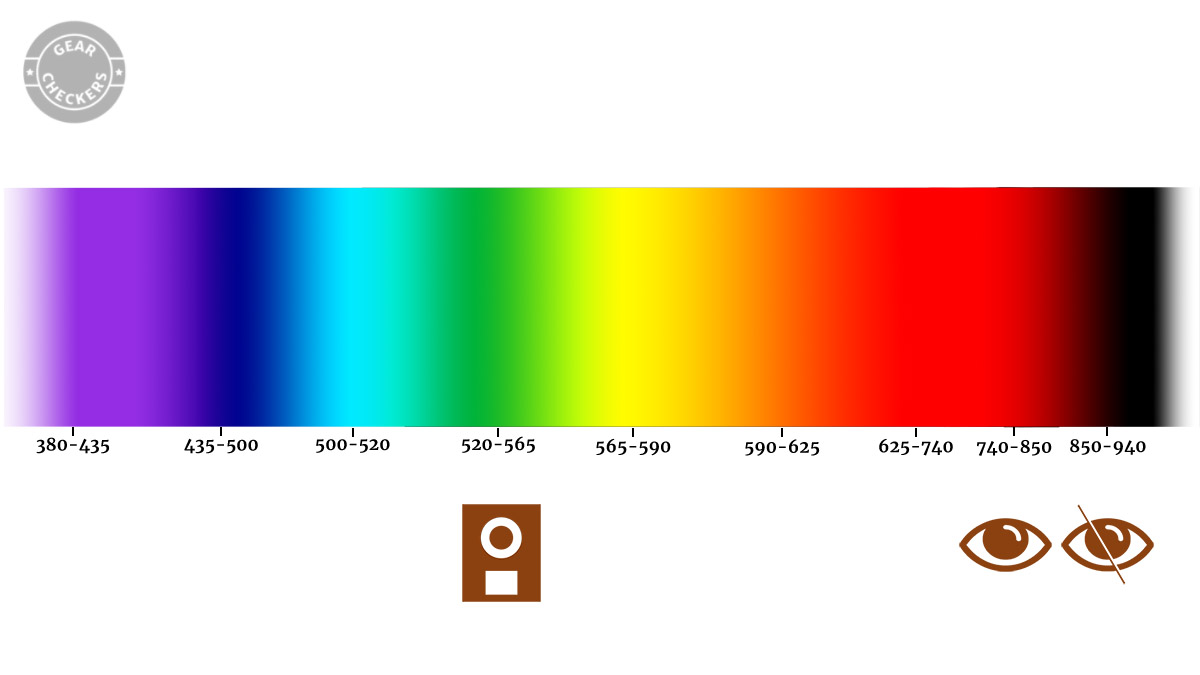
Visible Infrared Illumination (Red Glow)
Visible infrared illumination with a wavelength of 850 nm also labeled as Red Glow. The illumination emits both visible and invisible spectrum, resulting in a more illuminated scene. The disadvantage is that the trail camera emits a red light visible to the human eye. Humans can see the night illumination (which may lead to the discovery of the trail camera’s location and subsequent theft or damage), and so can animals (which may result in scaring off the animal).
Due to the mentioned disadvantages, we tend to avoid visible IR illumination in practice and rather use trail cameras with invisible illumination. Visible night illumination is most commonly found in cheap trail cameras and mini trail cameras. This is a compromise made by manufacturers to reduce production costs.
Invisible Infrared Illumination (No Glow)
The invisible infrared illumination (No Glow) with a wavelength of 940 nm emits a spectrum that is practically invisible to the human eye. Therefore, you won’t see the trail camera flash at night (or you’ll see it flash very faintly only when you’re very close). Animals also won’t see it, which means they will behave naturally.
White Flash and Colorful Night Photos
Some trail camera models have a white strobe flash (like a camera or mobile phone flash) or white LED diodes that illuminate the nighttime scene. This kind of illumination is, of course, very visible and can easily reveal the trail camera to a person. Paradoxically, most animals barely react to it, as it is similar to the flash of lightning during a storm.
Switching Between Day and Night Mode
Besides the visible color component of light, there is more or less IR radiation in the environment. Image sensors in standard photo and video devices (camera, video camera, mobile) are sensitive to this infrared radiation, and without the modification of an IR filter, they would capture false colors that look different from how the human eye sees them.
For accurate colors, trail cameras therefore need to have an IR filter in front of the sensor in daylight mode (which filters out IR radiation and only lets visible light through). Conversely, when shooting at night, the IR filter must be removed so that the trailcam can “see” the scene illuminated by the night light. The solution is simple, although it sometimes causes problems.
The IR filter is typically switchable and depending on whether the trail camera is shooting during the day or at night, the IR filter is activated or deactivated. This switching happens whenever the camera previously shot in a different mode. Sometimes, this click can cause some sensitive animal species to notice the trail camera, even if it has invisible illumination - because the sound of the IR filter switching, not the flash of illumination, alerts them.

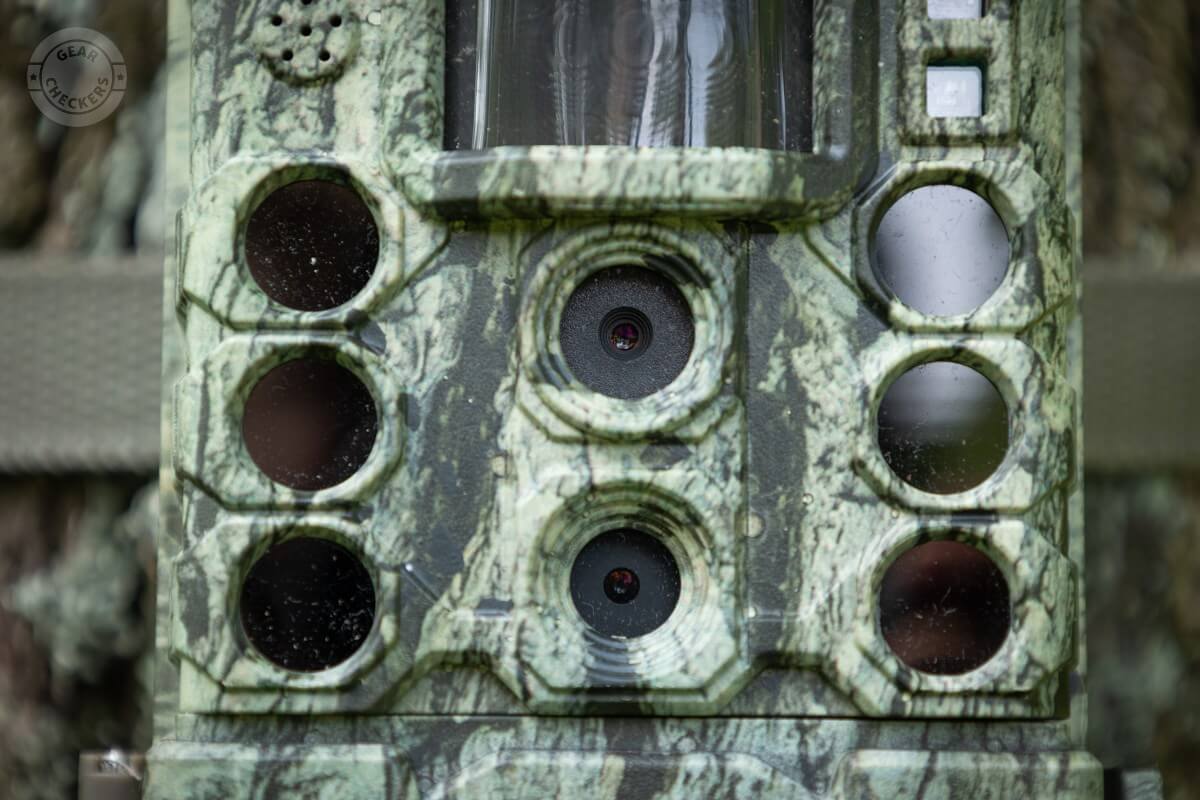
An exception in this regard is trail cameras, which have 2 lenses and 2 sensors - one for daytime mode and the other for nighttime mode. These can have a permanently built-in IR filter for the daytime sensor, meaning they do not click at the first night or daytime photos.
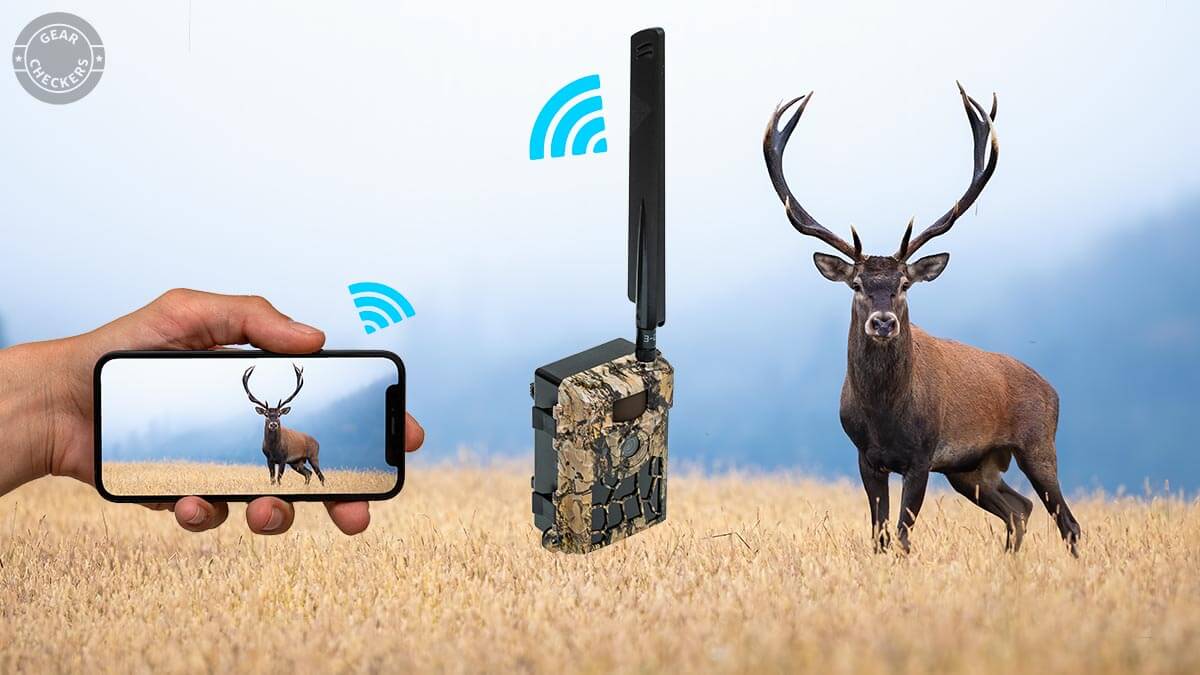
How Cellular Trail Cameras Work
Once activated by motion, or possibly turning on the night light, the trail camera starts to take photos or record video - depending on the settings we’ve chosen in the menu. The resultant photos and videos are stored on the memory card. When we come to check the camera later, we can view the photos directly on-site or take our time at home.
There are also trail cameras equipped with a GSM module, i.e., a device that can connect to a mobile network, just like cell phones. They are most often referred to as Cellular Trail Cameras, 4G trail cameras, GSM trail cameras, or sending trail cameras.
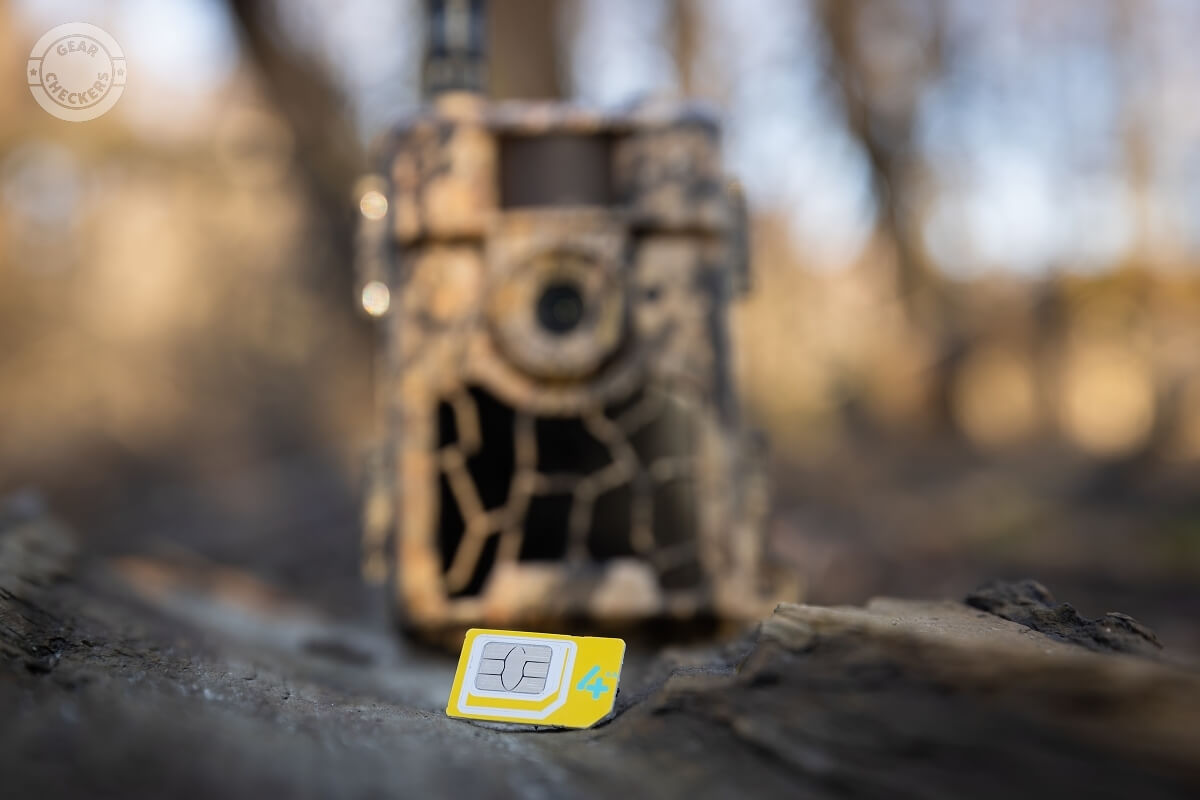
Such trail cameras often have a relatively large and visible antenna for better connection in areas with weak signal. If we insert a SIM card into them, these cellular trail cameras can send the captured images virtually in real time. It’s up to us whether we choose to send via MMS messages to the cell phone, via e-mails to the cell phone or computer, or latest via mobile data to the cloud, from where we can view them on any device.
Regardless of the mode of transmission (MMS, email, cloud), cellular trail cameras have several common characteristics and limitations. Primarily, there is a necessity to set up the connection to the mobile network correctly - this varies depending on the operator, SIM card provider, mobile services, and also the model of the trail camera. Manual setup of the trail camera to the correct values can be relatively complicated, fortunately, trail camera retailers sell models which are pre-set for local operators. Based on the inserted SIM card, they automatically recognize the provider and set everything necessary. The only thing we have to do in the menu is to choose the method of sending and set one or several recipients.
If you buy a trail camera abroad, it may not be able to recognize our operators and therefore you will have to manually set the detailed values in the menu. It’s good to keep this in mind when choosing a trail camera.
Summary of how trail cameras work
In the article, we have outlined a comprehensive view of the operation of trail cameras, including their properties and limitations, which are good to keep in mind in the field. Trail cameras can be very effective tools for monitoring animals in the wild. They can be used for small and large animals alike.
We looked more closely at how PIR motion sensors work, which detect movements and trigger the operation of the trail camera. We explained common causes of false alarms, such as direct sunlight, wind, and branches. From the principle of operation of the trail camera, it also follows that they may not capture too fast movements and it is necessary to distinguish between the detection angle of the PIR sensor and the angle of the camera’s field of view. In addition, we explained in the article various types of night lighting technologies and their advantages and disadvantages.
Finally, we introduced the operation of cellular trail cameras with transmission using a SIM card. In the article, we have simplified some principles technologically to explain how trail cameras work as accurately as possible but without being too complicated to understand. We emphasized the results for practical use.